| Author |
Message |
bus guy
Samba Member

Joined: November 13, 2002
Posts: 785
Location: Southsea, UK South Coast

|
 Posted: Fri Apr 19, 2019 1:09 am Post subject: Re: Houdini the Baja Bus Posted: Fri Apr 19, 2019 1:09 am Post subject: Re: Houdini the Baja Bus |
 |
|
| Great thread - I like what youve done with it so far - looking forward to seeing how you tackle the rear spare wheel carrier - something Ive thought about doing. |
|
| Back to top |
|
 |
Gubdonem
Samba Member
Joined: October 04, 2013
Posts: 39
Location: Ensenada, Mexico
|
| Posted: Sun Oct 21, 2018 9:30 pm Post subject: Re: Houdini the Baja Bus |
|
|
| smileyman3000 wrote: |
So I picked up some new vac hose, and some hose to go from the res to the master for the brake fluid.
Had some new hardlines made up for underneath, 100mm longer for the beam drop. Managed to get everything to bleed up good. Had a bit of trouble at first but go there in the end. I think it is good that the fluid has been flushed through, the old stuff was very black.
This is how it was sitting this afternoon with the beam drop and small tyres on the front still. WAAAAY nose up! I have driven it for a few days like this but today I got time to attack the rear suspension. Some before pictures first. And one side comparison shot from before the beam lift.
You can see that the back is pretty low compared to the front.
So time to crank the back one outer spline, that is meant to give 2.5 inches of lift.
You can see here that the spring plate cover has been getting a bit of rubbing, and so has the edge of the plate a tiny bit.
I marked the bearing carrier to the spring with white pen before removing the four bolts that hold everything together.
You then need to push the axle assembly towards the rear of the car. Where the brake hardline runs through the axle bearing carrier it also runs through a hole/slot in the end of the spring plate. You need to slide everything back and free this hardline so you don't damage it. Then you can release the spring plate off the stop.
Then pull the covers etc and pop the plate off the stop. They are under bugger all tension in a stock height bus so it's easy. Then I took the cover to the vice and trimmed a little bit off to prevent further rubbing.
Didn't take many more pictures of the reassembly, it's all very straight forward. Move the plate around one outer notch. I also pulled them and lubed the splines and sprayed some Lanolin inside the torsion housing. Fitted new spring plate bushings while I had it apart and lubed them up with plenty of graphite powder.
I took a picture of the left side bar just to show you all how nice they were. For a poor ugly bus the torsions were immaculate. Clean, painted and not a mark on them. The housing was perfect inside and the splines slide freely with no crude or rust. Very happy with that indeed.
Put everything back together and refitted the rear wheels. And some after shots. I gained about 60mm in the back end with one outer spline. This may settle a bit once I drive it.
Then I decided to fit up the other front wheels I have for it (225/75/15s). You can see here the rims have a bit more offset and fill the front guards out better.
And of course the standard measure of ground clearance in my shed, the humble milk crate 
Not quite under the front beam.
Heaps under the middle.
And good under the engine.
That's all for now. I really need to save up and get some new tyres all round for it. The rears are not matching and bald, and the fronts are very old. It is sitting pretty spot on level at the moment. But when two people get in the front it drops nearly 50mm. I might try and remedy that in the future when I build up my beam. I have some center adjusters to put in that could solve that problem.
But for now I am just going to cruise around for a bit and look down at everyone
Thanks for reading.
Smiley  |
How did you make the plates for the bean to give you more clearance? |
|
| Back to top |
|
|
smileyman3000
Samba Member

Joined: November 07, 2010
Posts: 238
Location: Yeppoon, Australia
|
| Posted: Sun Jan 08, 2017 6:53 am Post subject: Re: Houdini the Baja Bus |
|
|
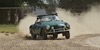
For Christmas I drove mum and dad down to my Grandma's (mum's mum) house, about a 1600km round trip to Killarney in southern Queensland. The bus performed flawlessly and the new cooler and fan combo kept the oil temp at a good level despite the hot temperatures we had.
Once down there we went for a bit of a drive out to Carr's lookout. Went via the Condomine River Road which has about a dozen creek crossing on it. All of them were rocky and firm and I don't think I barely go the hubs wet, the water level was quite low.
Stopped in at the Queen Mary Falls.
There is a large hill overlooking the small town of Killarney. It has the local phone tower on top of it. I have taken the Bug up too the top before so I was keen to see if the Bus could make it. The track up was quite a bit more washed out and eroded since I last drove it (about 4 years ago), but the bus managed to chug his way to the top. Got some outstanding pictures of the entire town.
The next day on the way home in the next town over we stopped and got a pictures of the trucks parked up at the Fraser depot. They were all washed and lined up perfectly with Christmas hats on the wipers. Was very well presented for the holiday break.
After the Christmas trip with the family the girlfriend and I turned the bus north and headed about 400km up to Mackay to visit some friends before New Years. From Mackay we headed west out to Eungella National park for a day trip and I little bit of mild offroading.
My friend drives a Hilux, I told her I would drag her out when she gets stuck
We went and did a track called the Diggings Road, which was actually pretty pissweak but I think it would be a hoot after some more rain. Was some steepish climbs (carbies suck the big one) with a bit of mud on them but I got through everything no worries.
On the bank of Broken River.
Coming through the creek crossing.
https://www.youtube.com/watch?v=_sfM7c7m0bY
A little mud puddle. Not too deep and very firm.
https://www.youtube.com/watch?v=NJGh3SdmQTE
The view from the pub where we had lunch. The platform is where they launch hang gliders down into the valley.
We then trekked back down the mountain to Finch Hatton Gorge for a bit of a swim. We had some inflatable boats so went for a little paddle. Should have brought the canoe!
Was a good little trip, I think there are plenty of more tracks to be had in the area too. Next day we drove back home for New Years party out at a friends dam on his farm. Took the mobile bed of course
A few pictures from this afternoon. Houdini dragged this poor little fella down next to the shed to be emptied out and then stripped down. Didn't think we were going to move it for a little bit. Had to drag it a couple of metres before the rear drums unlocked. The big tractor did well
That's all for now folks, thanks for looking. Plenty of more adventures and upgrades planned for the future so watch this space.
Smiley |
|
| Back to top |
|
|
smileyman3000
Samba Member
Joined: November 07, 2010
Posts: 238
Location: Yeppoon, Australia
|
| Posted: Sun Jan 08, 2017 6:14 am Post subject: Re: Houdini the Baja Bus |
|
|
Has been a busy little holiday period with a few trips away in the bus. But before that all happened there was a few things that needed to be attended to first.
Houdini back in the shed once again for some maintenance and upgrades.
Pulled both the axles out because I will be changing all of the CVs over.
But the first port of call was the rear brakes. Got some new shoes and new rear wheel cylinders as one was leaking. Also replaced the rear flexible lines, have been meaning to do this for a while and it was a good time while the fluid was out of the system.
While I had the CVs off I ran a tap through all the threads with a drill. But on one the stub spun around on me and snapped the tap off. Decided it was easy enough the undo the four bolts and drop the hub out given that the brake lines and handbrake cable were disconnected. I was fortunate that the tap was able to be knocked backwards out of the hole with a cold chisel.
While I had the hub off I could resist trying it in the "mega lift" position. You just bolt it on with the upper holes in the hub matched up to the lower holes in the spring plate and trailing arm. Gives some mighty big lift. A little out of the range of my CVs though I think
New brakes fitted up. And new soft lines.
Now it was onto the CVs. The CVs that I have in the bus at present are a bit of a mix. I think I have two original bus ones and two aftermarket fake Porsche 924/944 ones. I had a few dramas with the fake Porsche ones falling apart on Fraser Island. So I decided to pull the genuine Porsche ones that are in the Baja out and run them in the Bus for the time being. Getting decent CVs seems to be a real problem at present. Same goes for boots that don't want to split after 2 months (a story for another day)
So I pulled the axles from Alyce and pulled the CVs off. I cleaned one up to show the difference between the genuine ones and the cheap fake ones.
Cheap on the left and good one on the right.
Comparing the stars you can see the heat treatment marks on the good one.
In the cages there is a massive difference. The genuine one is about twice as thick and very stout. I have broken a number of the fake ones in the Baja and it was always the cage that broke apart.
The balls in the genuine CVs are actually smaller than the fake ones. They are supposed to be, smaller balls gives more angle. The balls in the fake ones are smaller than Kombi ones but not as small as proper Porsche ones. They are a weird in between size.
Lastly the main body of the genuine CV is a little bit wider, only a mil or two, but it is there. You probably can't tell from my shoddy camera work.
With the CVs and brakes sorted the next item on the list was oil cooler.
This is the second additional oil cooler that I have mounted up under the bus. It hasn't been in there for very long but it is coming out and getting changed to bigger one.
The replacement cooler and thermo fan. I wanted to change to a larger cooler simple so that I could fit a fan on top of it. I found at Fraser that slow chugging around on the inland tracks where you would be going slow with a moderate load on the engine would cause the oil temp to slowly creep up. I want a fan so I can keep some air flowing over the cooler even when I'm not moving very quickly.
Fan is 200mm and I presently just have it wired up to a relay with a switch on the dash. So I can turn it on or off. I am planning to add a thermostatic switch to the oil lines so the fan will come on at 80 or 85°C. But in the meantime I keep a pretty good eye on the temp and flick it on when needed. I can also turn it on beforehand if I know a big hill/obstacle/whatever is coming up.
Made up some mounts but it seems I didn't get a picture of it under the bus. It mounts in the same spot as the other one but horizontally with the fan on top. The fan is setup to push air down and through the cooler. I might even try some shrouding later on to create some low pressure below and behind the cooler to assist airflow.
One other thing I did was fit new front and rear shocks. Turns out that the front shocks that were on the bus are too short. Looks like they are bug ones going by the length. This would have been limiting my downtravel slightly on the front. And probably the reason why the front shocks quit working day three or Fraser
Smiley |
|
| Back to top |
|
|
smileyman3000
Samba Member
Joined: November 07, 2010
Posts: 238
Location: Yeppoon, Australia
|
| Posted: Fri Dec 09, 2016 5:11 pm Post subject: Re: Houdini the Baja Bus |
|
|
I encourage both of you to go for it! They really are a bundle of fun!
Best part is that you have your bed with you so you can just stop and camp whenever and wherever you like!
Smiley |
|
| Back to top |
|
|
heywebonya
Samba Member

Joined: July 08, 2010
Posts: 823
Location: Portage, MI
|
| Posted: Fri Dec 09, 2016 5:14 am Post subject: Re: Houdini the Baja Bus |
|
|
Reading your post is making me consider a baja conversion on my minivan. A little lift, some bigger tires and most stock vehicles are pretty capable.
Great job!
_________________
If I knew what I was doing; I wouldn't be building a buggy! |
|
| Back to top |
|
|
Skorzeny's G Ride
Samba Member

Joined: July 10, 2007
Posts: 291
Location: Gods curse on humanity...The Arizona Desert
|
| Posted: Thu Dec 08, 2016 3:29 pm Post subject: Re: Houdini the Baja Bus |
|
|
My friend and i were talking about doing a baja bus. haven't seen someones project yet and just came across this. Your bus is awesome. Thanks for posting please continue.
_________________
...70 type 181
...59 Beetle
...62 beetle baja (new) |
|
| Back to top |
|
|
smileyman3000
Samba Member
Joined: November 07, 2010
Posts: 238
Location: Yeppoon, Australia
|
| Posted: Thu Dec 08, 2016 4:02 am Post subject: Re: Houdini the Baja Bus |
|
|
A few pictures from a Rover Scout camp I went down and helped out at last weekend. Was held and Awoonga Dam near Gladstone and we went out to Boyne Island/Tannum Sands Saturday.
I took a canoe down, towed my trailer down with a tent in it and took 3 people down and all their camping gear. And Friday's temperature was like a firestorm from hell. Probably the worst conditions I could have towed in with all that weight. Oil temp was at about 100°C most of them time but did come down a bit on the flat and coasting down hills. Very happy with how it went, but would still like to add a fan to one of my coolers.
This is Friday Afternoon when we showed up.
Saturday morning down at the beach. I nabbed a good spot right next to the sand and put the awning out for everyone. The shade was most welcome.
I backed into the park. People were guiding me over next to the gutter but no one was looking behind me. I stopped the bus and got out to set up and thought, "That ute is a bit close". Probably could have just put a feeler gauge between them! Lucky I didn't go back any further. In my defense though, I am in my park
A nice picture from the canoe.
Was a little windy but the awning stayed put all day. Lucky I had some big sand pegs to hold it down.
Saturday afternoon we went down to the dam for a swim. We were camped at the Scout grounds about 500m away so I took about 10 people down in the back of the bus. I drove all the way to the water's edge.
A few other people came down as well in 4WDs. None of them could drive back up the bank to camp because the ground was a little loose and rocky. They all had to put it into 4WD. I offered them a tow Gee they make easy shit look hard sometimes. Houdini chugged back up there without even a hint of wheelspin, even with the extra bodies on board (the extra mass might have helped!)
If anyone wants to know what the tent looks like. This is why you need a trailer to move it
All loaded back up and ready to cruise home Sunday.
Thanks for looking everyone
Smiley |
|
| Back to top |
|
|
smileyman3000
Samba Member
Joined: November 07, 2010
Posts: 238
Location: Yeppoon, Australia
|
| Posted: Thu Oct 13, 2016 4:55 am Post subject: Re: Houdini the Baja Bus |
|
|
| Bashr52 wrote: |
When are you going to finish up Alice? I want to see that air locker at work!  |
Hoping when I get back from Fraser to attack again. Will have to dig her out of the pile of crap that has been building up around her.
Smiley |
|
| Back to top |
|
|
Bashr52
Samba Member

Joined: July 16, 2006
Posts: 5666
Location: On an island in VA
|
| Posted: Thu Oct 13, 2016 4:51 am Post subject: Re: Houdini the Baja Bus |
|
|
| When are you going to finish up Alice? I want to see that air locker at work! |
|
| Back to top |
|
|
smileyman3000
Samba Member
Joined: November 07, 2010
Posts: 238
Location: Yeppoon, Australia
|
| Posted: Thu Oct 13, 2016 4:27 am Post subject: Re: Houdini the Baja Bus |
|
|
After the beach run I got started on fitting up another oil cooler. With the Summer heat already getting up around here and the Fraser trip looming I thought it would a good addition to keeps the temps down. Longer term plan will probably be to swap one or both of these small coolers out for a large one with a thermostatically controlled fan.
The new cooler is mounted to the same frame as the first one.
I also added an extra support bracket to hold the centre of the frame up and stop it sagging in the middle.
All plumbed up. You can also see the extra brace. It bolts through an 8mm holes that was already in the tophat frame.
Last time I had the engine and box out I noticed some play in the front mount. This demonstrated itself on the sand with the engine revving itself up and down slightly at points. So I ordered a new mount when I got some other parts.
Here is the old mount removed.
Unfortunately the new mount was a different shape. Slightly smaller and more rounded on the corners that face towards the front of the car. I thought that perhaps my mount cradle was beginning to wear out. So I grabbed another cradle be came up with the same result, the new mount is just the wrong size.
You can see the gaps in the corners of this picture.
The old mount was actually still in good condition. Just a little loose in the cradle. So I decided to deck the back of the cradle where it sits against the gearbox. This will clamp the rubber up tighter and take the slack out of the mount.
I trimmed about 2-3mm off the cradle with the grinder and then flattened it out with a hand file. You can see the inside is polished up from the rubber moving back and forward in it.
This did the trick and the mount bolted up far more firmly in the bus.
Today I also added a plug under the back seat for the fridge. Still have to run some wire to it. Will be 6mm straight from the battery.
That's all for now. Will get some pictures on the Fraser run.
Thanks for looking.
Smiley |
|
| Back to top |
|
|
smileyman3000
Samba Member
Joined: November 07, 2010
Posts: 238
Location: Yeppoon, Australia
|
| Posted: Thu Oct 13, 2016 4:02 am Post subject: Re: Houdini the Baja Bus |
|
|
I put my trailer on the bus the other day to see how it looked. I was expecting it to be a lot more nose up. But I think Houdini's saggy butt has it sitting fairly level.
Took a mate that was visiting for a day for a run out to 5 Rocks. Haven't been out there since the bus has been lifted so was interested on how he would go. Was a bit softer than last time but made it up the big dune to get in no worries. This is us at the top. Had to air down a bit though
Drove up through the small township and out onto the headland. Got some good pictures. Scott had a far more fancy pants camera than me. So when I get some pictures off him I will post them up too.
Headed down to the beach and cruised around some more. Found some rocks to flex on. Houdini is a little lacking. But when I get back in the car the front right compresses up a lot more.
I was very happy with the way the bus performed in the sand. With the tyres down and the mass balanced a little more to the rear with the new back bar he got the power down nicely. You have to back off with the grunt of the Type 4 otherwise he just wants to spin wheels. Have to just let him chug of through.
Was a great test run before Fraser this weekend to check things and get a feel for the bus.
Smiley |
|
| Back to top |
|
|
smileyman3000
Samba Member
Joined: November 07, 2010
Posts: 238
Location: Yeppoon, Australia
|
| Posted: Thu Oct 06, 2016 4:15 am Post subject: Re: Houdini the Baja Bus |
|
|
I fitted the tow hitch box section into the main bar. Then level this up behind the bus. I used the blue screw jackstand to tune in the angle of the tow hitch. I measured the roof gutters of the bus with an angle finder and made it the same angle on the tow hitch. So should be level if the bus is.
Then I tacked it up so I could see how it looked before I welded it out. I Trimmed the hitch back too, left it a little oversized so I can set the right length later.
I welded the hitch in first. Then both ends. Then fitted it back to the bus so I could tack the angled pieces in place and then weld them on too. I think it pulled a little when the angle was fitted. It was a little tighter on the chassis and needed some hammering to get on. This doesn't really bother me. Once it is finished and on for the final time I don't intend on removing it again.
I welded a couple of nuts on the ends so I could bolt the bumper in place to head down to Warwick (900km each way). Will make some better mounts now that I am back. The towball is just in there for show. I hadn't drilled the pin hole at this point.
I am happy with how it looks. It has spaced the bumper out a bit. But I think the tyre carrier will cover this up. It is super strong and that is what is most important.
Drove the car down 900 odd km to Warwick for the VW drags. I am fortunate that my grandma lives 30km away the next town over. So I always have somewhere nice to stay every year when I go down for the drags. I gave the bus a good wash the Friday before the show.
Bus setup next to the drag strip watching the racing. Was going to put it in the show and shine, but we liked having the shade a lot more. Plus he doesn't exactly shine
This afternoon I finished off the trailer hitch on the bar. I marked then drilled the holes through for the pin.
Then I trimmed off the excess length I didn't need.
I slid the towball as far in as it would go and used the hitch as a guide to add a new set of holes in it. So now I have two different spots it can be at. But I think I will just use it on the holes that have it furthermost in.
So now we have towbar! Just need a plug and it should be good to go. That's all for now folks.
Thanks for looking.
Smiley |
|
| Back to top |
|
|
smileyman3000
Samba Member
Joined: November 07, 2010
Posts: 238
Location: Yeppoon, Australia
|
| Posted: Thu Oct 06, 2016 3:51 am Post subject: Re: Houdini the Baja Bus |
|
|
Got some more work done on the rear bar before the Warwick VW Drag weekend.
I cut the hole in the rear bumper for the tow hitch to come through. I drilled the corners first with a 10mm drill to get the corners of the hole a nice radius.
I decided to fit the trailer plug through the box section. But because I want to use the bar as an air tank this means keeping it all airtight. So I picked up a length of heavy wall tubing, sliced a bit off and will weld it in place to create a void for the plug to go in so I don't have to space the rear bar a km off the back of the car.
The tubing I got is seamed. So when I cut the slot in it I made sure that I cut the seam out of the tube. One less weak point to worry about.
I worked out where I wanted it on the box and marked and cut it out so the tube was a nice hammer fit.
A little tidy up and you can see where the plug will sit. I have some 6mm plate that will also get welded on top of the bar. This is so I have something to bolt the plug down to without drilling holes in the box section. Still needs to be trimmed to shape and welded on.
Back to the bar mounts. It was suggested from a friend that I drill the mount bolts through the chassis and clamp through the whole thing. He said the thread in the chassis isn't the strongest. He has done the same thing on his bus and tows a car trailer with it so no arguments from me.
You can only do it with the front two bolts. The rear one is inside the pillar at the back of the engine bay so you can't get to the top of it.
Then I bolted up the mounting plates. They are only tacked together at the moment. The large side plate will be bolted through the chassis in three places. Only one for the time being. There was one 10mm holes in the chassis already that I am using. But the engine needs to come out to drill the other two, these will be 12mm. I will also enlarge the other one to 12mm too. And the 40mm angle is bolted up through the chassis in the 3 factory holes. I made some plates out of 6mm that sit on the top in the engine bay.
You can see in the next picture how the box will be welded to the mounts. The side plate caps the end of the box and the angled piece will be welded to the side of the box. I tacked it, then removed the angled piece so I could fully weld around the end of the box and make an airtight seal with the end plate. Then the angle was welded on second.
I took the box section and had it blasted. So it would be a bit cleaner inside and nicer to weld up.
Smiley
Last edited by smileyman3000 on Thu Oct 06, 2016 4:17 am; edited 1 time in total |
|
| Back to top |
|
|
smileyman3000
Samba Member
Joined: November 07, 2010
Posts: 238
Location: Yeppoon, Australia
|
| Posted: Sun Sep 25, 2016 6:14 am Post subject: Re: Houdini the Baja Bus |
|
|
This is the rear bar bolted up in the factory location. I was messing around trying to work out where to fit the trailer plug on the rear bar. I am aware that there is currently one in the engine hatch but there is no wiring to it and I don't want it there, I also think that the tyre carrier might get in the way of plugging the cable in.
I though maybe I could fit in in between the box and the rear of the body. But with it in place that gap to the back of the vehicle looks horrible. The bar is stood off a mile. It doesn't look so bad in the pictures, but in the flesh it looks like the bumper is falling of the back of the bus. Way too much gap.
Even with the box pushed in to where I plan to run it has more gap than I thought it would. The next picture the box is gapped to the back of the bus and the bumper is pushed as far over it as possible. But hoping that the tyre carrier will mask some of this gap.
I cut out the mounting plates that will be welded to the ends of the box section. I have also cut some 40mm angle that will be bolted to the underside of the chassis too. Will get some more pictures of this tomorrow.
When I cut the plates out I drilled some 10 or 12mm holes at the inside of the radius of any corners. I didn't want to cut squarely into the corners with the thin cutting disc and create a stress area that cracks could start at. Has to be strong enough to snatch 4WDs out when they get stuck, so don't want it snapping of the back of the bus!
I dropped the 100mm box off to get sandblasted inside and out. I am planning to use the box as an air tank so I wanted it clean inside. Prior to welding it up I will spray some oil in it for the time being to stop it rusting up. Then later I can add fittings and pressure relief etc.
Next up I started work on the cold air intake for the engine. I bought some tube and bends off eBay. And was trying to work out the best way to mount them to the side of the engine bay.
I was around helping someone with a few things on their bus and noticed that it had factory mounts for an intake pipe. Because my bus is injected it had the airbox mount but not these two intake brackets. So I went and had a look in the back of one of the Bay wrecks that I have and sure enough, it has the mounts. Cut them out with a cordless grinder and they happen to be the perfect size for the 2.5 inch tubing. And the hose clamps I have fit nicely into the back of them.
Started mocking up where I wan the intake to run. I wanted it a bit higher in the bay than this to get it up clean of the battery and out of the way.
I ended up cutting one side of the 45° bend as short as possible. This brings the bend closer to the intake where it clamps on and further away from the side wall of the engine bay. So it angles up for longer and tucks up higher out of the way.
I cut one leg off the alloy tubing to shorten it up to hug around the corner of the firewall above the battery. The piece I cut off happened to be the perfect length to put between the 45° and 90° blue bends. This is the intake pipe all assembled how it goes in the car.
I fitted the intake mounts using nutserts. I figured bolting them it was easier than trying to weld in the engine bay. And they are super easy to take in and out now too. The first one is basically where the factory had it. And the one above the battery I moved further out to the right of the car to support the end of the tube as much as possible.
I clamped the intake in place before getting a picture of the second mount. It is under that hose clamp there.
Intake all fitted in place.
Looking down the hatch in the back.
Heaps of clearance above the battery.
And that's how you fit a cold air intake to you bus
Thanks for looking, more soon.
Smiley |
|
| Back to top |
|
|
smileyman3000
Samba Member
Joined: November 07, 2010
Posts: 238
Location: Yeppoon, Australia
|
| Posted: Wed Aug 24, 2016 5:09 pm Post subject: Re: Houdini the Baja Bus |
|
|
| TDCTDI wrote: |
| Quit screwing with the damn bus & give us some updates on the bug. |
I actually bought an oil filter for Alyce a few days ago that is coming in the mail. Then I just need to get the condenser and thermo fan. And I can play a game of Tetris, Expert Level - Fitting everything under the fuel tank in a bug.
Smiley |
|
| Back to top |
|
|
TDCTDI
Samba Advocatus Diaboli
Joined: August 31, 2013
Posts: 12862
Location: North Carolina
|
| Posted: Wed Aug 24, 2016 11:43 am Post subject: Re: Houdini the Baja Bus |
|
|
Quit screwing with the damn bus & give us some updates on the bug.
_________________
Everybody born before 1975 has a story, good, bad, or indifferent, about a VW.
GOFUNDYOURSELF, quit asking everyone to do it for you!
An air cooled VW will make you a hoarder.
Do something, anything, to your project every day, and you will eventually complete it. |
|
| Back to top |
|
|
ORANGECRUSHer
Samba Member

Joined: June 09, 2006
Posts: 2678
Location: West Coast (Michigan's)
|
|
| Back to top |
|
|
smileyman3000
Samba Member
Joined: November 07, 2010
Posts: 238
Location: Yeppoon, Australia
|
| Posted: Wed Aug 24, 2016 4:46 am Post subject: Re: Houdini the Baja Bus |
|
|
Got a little more done this arvo on the rear bar.
I noticed when I removed the factory bar, that the brackets bolt to the underside of the chassis with two M10 bolts. But there is a third threaded hole in the chassis a little further forward. I ran a tap through all of them and will be using all three for the mounting plates. Does anyone know what the factory used the third hole for?
I am using some 40x40mm angle that will bolt up to the underside of the chassis and weld to the bar.
In addition to the angle I am making some side plates out of 6mm plate that will weld to the ends of the box and cap them off. I am basically copying Andrew's bar he made for his bus but changing a few things. His build here http://www.manxclub.org/phpbb3/viewtopic.php?f=2&t=1582&start=60
The plates will bolt through the chassis with some M12 bolts and crush tubes. Just have to make sure that it clears the rear engine mount bar.
While I was lying under the car looking at how I was going to mount the bar I noticed that the flange for where the exhaust tip bolts to the muffler was cracked on the underside. I removed the muffler and gave the crack a cleanup, and then laid a bit of weld in there to fix it up. I was lucky enough to have some new exhaust gaskets left over from my dad's bug (we ended up with two sets for some reason). So I refitted it back up with the new gaskets.
Then I spent a while taking a lot of measurements and working out where I want the box and rear bar to sit. I have decided to lift it up 15mm higher than factory. And the gap between the rear or the body and the box will be 30mm. Then I drew this all out on a cardboard template to see if it would fit. I like to write the measurements straight on the template for a quick reference. Then I tried it on the car, I had to adjust a few dimensions to get it to fit perfectly. Also sat the box in place on jackstands to offer the template up to it.
Last thing I got done this afternoon was to let the hole through the centre of the main box for the tow hitch box to go into. First I marked out the centre point on the main box and marked out where the hole needs to be for the smaller box to go through.
You can see in the previous picture that the corners of the small box are very rounded. I didn't want to be filling up large gaps with weld. I wanted to make the join as snug as possible so the welds can be airtight and strong. In the future I would like to used the large box section of the barwork as an air compressor tank.
With that in mind I measured the radius of the corners and used a 20mm drill bit to put the curves in that I needed. Then I just cut the straight edges with a thin cutting disc and tapped the waste out with a hammer. Ended up with a nice pair of home made Iron Crosses at the same time
With the holes cut I just had to tidy the perimeter up a little with the die grinder until the small box was a nice fit. I can tap it through with a hammer and block of timber. The final length still needs to be worked out. It will need to protrude through the stock bar enough that I can get the hitch pin in it. I will be sticking it about 5mm through the front side so I can get a nice weld on it.
As always, thanks for looking.
Smiley |
|
| Back to top |
|
|
smileyman3000
Samba Member
Joined: November 07, 2010
Posts: 238
Location: Yeppoon, Australia
|
| Posted: Tue Aug 23, 2016 3:09 am Post subject: Re: Houdini the Baja Bus |
|
|
| dustymojave wrote: |
| Constant progress Smiley! Nice project. |
Thanks mate!
Made a start on the rear bar this afternoon.
I want to to look basically the same as a stock one. But it will be 100x100mm box with the stock bar wrapped around it. It will also have a hole in the middle for the tow hitch. And eventually I will add the swingout tyre carrier for the spare too.
You can see in the next picture that I don't want to drop the bar at all from its currently position. It will foul the exhaust tip. I might even raise it slightly so I can redo the exhaust at some point to get a little more clearance under it.
It's official, buses look completely weird with the rear bar removed. Gives a bit better view of the new heat shield though
Here is the box sitting in place. It is currently too long. I am going to trim it back to the same width as the chassis rails in the back, 1115mm for those playing at home. Was actually a lot easier than I thought to cut through it with the 100mm grinder.
Bar sitting back in the stock location...
...but now it has the box insert sitting inside it
That's all I got done today. Hoping to get the mounting plates fabbed up tomorrow so I can mount the box up to the chassis.
Thanks for looking.
Smiley |
|
| Back to top |
|
|
|


