| Author |
Message |
Malokin Martin
Samba Member

Joined: August 19, 2007
Posts: 3100
Location: E-burg

|
 Posted: Mon Jan 23, 2017 6:59 pm Post subject: Re: Rotisserie Posted: Mon Jan 23, 2017 6:59 pm Post subject: Re: Rotisserie |
 |
|
Could someone give me a bit of advice? We're about to take the plunge and remove the running gear.
1.) If we used 2.5 in. OD 0.105 thickness ROUND pipe for the rotisserie, are we loosing significant strength vs the same thickness SQUARE? (Same Half tipper version as the post directly above). Like should we be concerned with the round? My friend has a pile laying around he's willing to donate for free.
2.) if we're doing strictly the lower frame/flooring (underside only) would it be ok to use mild/low pressure sand? I know walnut is better, but it's bonkers more expensive.
Thanks in advance! |
|
| Back to top |
|
 |
cdennisg
Samba Member

Joined: November 02, 2004
Posts: 20290
Location: Sandpoint, ID
|
| Posted: Sat Oct 29, 2016 9:19 am Post subject: Re: Rotisserie |
|
|
This is 100% pure excellence. Well done!
_________________
nothing |
|
| Back to top |
|
|
EverettB 
Administrator

Joined: April 11, 2000
Posts: 69838
Location: Phoenix Metro
|
|
| Back to top |
|
|
sgellis
Samba Member

Joined: July 06, 2016
Posts: 2016
Location: SW Nova Scotia, Canada
|
| Posted: Sat Oct 29, 2016 4:09 am Post subject: Re: Rotisserie |
|
|
| j.pickens wrote: |
Really nice. This design is perfect. The low profile dollies which can be moved to any of the flat angles are very cool.
When you rotate onto or off of the dollies, is there a way to stabilize or hold them in place?
That could be a delicate maneuver, especially if you are by yourself doing the rotating.
Also, did you add clamps to attach to the roof gutters? I would think that they would help stabilize things. |
Thanks!
I roll the bus up a little so the rollers will slide under part way. Let the bus back onto the roller and use my foot to push on the roller and pull on the frame to centre it. Easy once you get the hang of it. I always rotate from the rear frame. A stripped bus is not very heavy.
I didn't add anything to the drip rail. Front has lots of clearance, rear about 2". There is some bounce in the frame but not enough to hit the drip rail. Thought about adding some bracing to the inside of the loop to stop the flex but I don't notice it at all while working.
_________________
My 64 Kombi restoration
My camper interior build
My 54 standard restoration
The Nova Scotian Barndoor (YouTube)
The Nova Scotian Barndoor (CAD drawings) |
|
| Back to top |
|
|
j.pickens
Samba Member
Joined: December 03, 2002
Posts: 9791
Location: Exit 7, New Jersey
|
| Posted: Sat Oct 29, 2016 1:25 am Post subject: Re: Rotisserie |
|
|
Really nice. This design is perfect. The low profile dollies which can be moved to any of the flat angles are very cool.
When you rotate onto or off of the dollies, is there a way to stabilize or hold them in place?
That could be a delicate maneuver, especially if you are by yourself doing the rotating.
Also, did you add clamps to attach to the roof gutters? I would think that they would help stabilize things.
_________________
Founder and Chairman Emeritus, ECMSAS
BBX BBXII and BBXXI Long Distance Award Winner
| BeaterBarndoor wrote: |
i wish more people would actually drive their vws rather than just talking about what they have in the garage. |
| Red Fau Veh wrote: |
If you've seen one sunroof swivel seat kombi, you've seen them all!  |
|
|
| Back to top |
|
|
EverettB
Administrator
Joined: April 11, 2000
Posts: 69838
Location: Phoenix Metro
|
|
| Back to top |
|
|
Malokin Martin
Samba Member
Joined: August 19, 2007
Posts: 3100
Location: E-burg
|
| Posted: Fri Oct 28, 2016 3:32 pm Post subject: Re: Rotisserie |
|
|
| Could you see if Everett would host the PDF here? It's rare that someone takes the time to write it out like that. |
|
| Back to top |
|
|
Peter_N
Samba Member
Joined: February 19, 2014
Posts: 323
Location: The Netherlands
|
| Posted: Fri Oct 28, 2016 12:43 pm Post subject: Re: Rotisserie |
|
|
Nice design Sgellis! And cool to share all the detailed building plans 
_________________
My 1958 PGSG project topic |
|
| Back to top |
|
|
sgellis
Samba Member
Joined: July 06, 2016
Posts: 2016
Location: SW Nova Scotia, Canada
|
| Posted: Fri Oct 28, 2016 8:39 am Post subject: Re: Rotisserie |
|
|
Thought I would share my rotisserie design. It is based on some others from this thread.
I wanted easy access to the bottom of my bus but not have a frame in the way when working on the sides. Also wanted something cheap that I could easily build. So this is my 1/3 rotisserie that can be switched from side to side.
I can role it by myself once I figured out the tricks. Also built some rollers to help moving it around from 3" channel iron and angle with some cheap casters. Larger casters with locks would be better. Keeping the channel close to the floor makes it easy to use. I just tip the bus up a bit and slide them under the rotisserie.
I am very happy with how it works. Makes life much easier. I would hate to try this project without a way to roll the bus.
If anyone wants a PDF of the plans PM me.
Update: Link to Rotisserie PDF
_________________
My 64 Kombi restoration
My camper interior build
My 54 standard restoration
The Nova Scotian Barndoor (YouTube)
The Nova Scotian Barndoor (CAD drawings) |
|
| Back to top |
|
|
WrennMetallWerks
Samba Member
Joined: December 06, 2007
Posts: 2667
Location: Rescue ca
|
|
| Back to top |
|
|
WrennMetallWerks
Samba Member
Joined: December 06, 2007
Posts: 2667
Location: Rescue ca
|
|
| Back to top |
|
|
earlywesty
Samba Member

Joined: May 03, 2004
Posts: 2358
Location: In the woods, Ontario
|
| Posted: Tue Jun 16, 2015 4:03 am Post subject: |
|
|
| Peter_N wrote: |
Finished my rotisserie yesterday
I tried to keep it as simple as possible and because almost all the welding has been done I could place the front hoop around the doors. I'm solely going to use the rotisserie to sandblast the undercarriage and paint it afterwards (most likely completely sand green)
Although I did hesitate a bit to leave the doors in (because of weight) in the end I left them in and strapped them together.
I was inspired by JOGR's simple design wherein the U-beam used to make the hoops acts as a rail for the wheels.
The hoops are connected to the bus using a 1/3" thick steel plate on the front axle bolt holes and rear torsion beam.
If I found some heavy steal beams in the future I maybe gonna replace the wooden beams, but for now it works great. The wooden slats will be connected to keep everything square.
Both hoops are connected to eachother over the roof as this is the most wobbly part of the hoops. The downside of using U-beams in stead of square tubing for the hoops is the poor axial stiffness. I just jammed some foam pads between the roof and the hoops, but for what I can see now, that's not even necessary.
Really enjoyed building it. If someone needs dimensions I'll be happy to provide them.
Peter |
I want one of these style so bad. If anybody finishes with one and wants to part with it please let me know. |
|
| Back to top |
|
|
Spitty1974
Samba Member
Joined: September 30, 2011
Posts: 647
Location: California
|
| Posted: Mon Jun 15, 2015 5:51 pm Post subject: Height Question |
|
|
Hi,
I'm building a dolly system/rotisserie for my bus and I want to have the option of being able to flip it over 45 degree angle if I decide to do that later. As of now, I'm trying to get it high off the ground so it is easier to work on underneath. I may only need to keep it that way, but want the option down the road to tilt it.
I'm sort of following the example on this thread that is on a double cab.
My questions are as follow:
My over all height for my casters are 6 inches with the plates bolted on top of the caster. I'm using 2 inch square tubing. I'm going to run a 66 inch piece of 2x2 inch sq tubing under the bus in a horizontal position and both ends are cut at a 45 degree angle. The tubing will sit on the caster plates I made and I will weld the tube to the plates.
What is the max length I can go for the two vertical posts that will join to the tube that rests on the casters and then be welded up to the plate that gets bolted to the beam plates I made?
I measured my garage and the max I can go is 20 inches above the caster plates. In your opinion, for people who have built or used a tilt version, what is the max length of the vertical posts above the caster? The higher I go, will it be problematic if I decide to tilt it down the road?
I really wanted to make the round rotisserie for my bus, but I just don't have the height in the my current garage set up. I'm building workshop down the road that will have the height, but that is down the road.
I included a pic that shows what the horizontal and vertical tubes position and what they will look like once welded (they are not the exact pieces, just scraps for an illustration).
Thank you for any suggestions and or help.
|
|
| Back to top |
|
|
Chad M
Samba Member
Joined: July 14, 2003
Posts: 723
Location: Alberta
|
| Posted: Wed Feb 25, 2015 2:13 pm Post subject: |
|
|
FYI. The poster before you has the starring role in that video.  |
|
| Back to top |
|
|
western auto
Samba Member
Joined: July 20, 2013
Posts: 293
Location: yuma,az
|
|
| Back to top |
|
|
glideking
Samba Member

Joined: February 02, 2013
Posts: 990
Location: California
|
|
| Back to top |
|
|
Peter_N
Samba Member
Joined: February 19, 2014
Posts: 323
Location: The Netherlands
|
| Posted: Sun Nov 30, 2014 10:54 am Post subject: |
|
|
Finished my rotisserie yesterday
I tried to keep it as simple as possible and because almost all the welding has been done I could place the front hoop around the doors. I'm solely going to use the rotisserie to sandblast the undercarriage and paint it afterwards (most likely completely sand green)
Although I did hesitate a bit to leave the doors in (because of weight) in the end I left them in and strapped them together.
I was inspired by JOGR's simple design wherein the U-beam used to make the hoops acts as a rail for the wheels.
The hoops are connected to the bus using a 1/3" thick steel plate on the front axle bolt holes and rear torsion beam.
If I found some heavy steal beams in the future I maybe gonna replace the wooden beams, but for now it works great. The wooden slats will be connected to keep everything square.
Both hoops are connected to eachother over the roof as this is the most wobbly part of the hoops. The downside of using U-beams in stead of square tubing for the hoops is the poor axial stiffness. I just jammed some foam pads between the roof and the hoops, but for what I can see now, that's not even necessary.
Really enjoyed building it. If someone needs dimensions I'll be happy to provide them.
Peter
_________________
My 1958 PGSG project topic |
|
| Back to top |
|
|
jmunster
Samba Member
Joined: November 10, 2014
Posts: 7
Location: Dillingham, AK
|
| Posted: Tue Nov 11, 2014 10:49 am Post subject: |
|
|
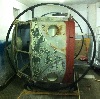
A couple pics of the rotisserie |
|
| Back to top |
|
|
jmunster
Samba Member
Joined: November 10, 2014
Posts: 7
Location: Dillingham, AK
|
| Posted: Mon Nov 10, 2014 10:27 pm Post subject: |
|
|
| If anyone is looking for a simple solution to a rotisserie as a tool to help them restore a bus then look no further than the original post. Awesome,simple, quick. Just remember your angle has to be dead on. I chose to make my dodecadon out of 2x2x1/8 and the supports out of 3/16. STRONG. I also added supports at 90 degrees down from the mounting plates and decided that cutting the multigons in half was not necessary. It took me 19 hours and under $150 in steel. Now I can get to business without lying on the ground. Thanks for the idea. |
|
| Back to top |
|
|
Spitty1974
Samba Member
Joined: September 30, 2011
Posts: 647
Location: California
|
| Posted: Thu Sep 18, 2014 6:53 pm Post subject: |
|
|
Thanks for the help with the measurements, I appreciate it!
If I feel my version is worthy of this thread, I will post some pictures once it is completed. |
|
| Back to top |
|
|
|


