| Author |
Message |
Kb65single
Samba Member
Joined: July 24, 2019
Posts: 273
Location: Obxnc

|
 Posted: Fri Sep 08, 2023 8:10 am Post subject: Re: Rusty 65 SC restoration Posted: Fri Sep 08, 2023 8:10 am Post subject: Re: Rusty 65 SC restoration |
 |
|
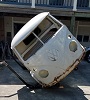
Dogleg fit to the door then...
Noticed that the space for the door seal varied. Went to the passenger side and measured a few spots. They were consistently in the 19-20mm wide range. They were also 10mm deep.
Mine were a lot wider, especially where the leg turns down and along the wheel well section going towards the front floor.
The wheel well panel had a significant bow in it. Correcting that might decrease that space. The rust in between the dogleg and wheel well panel could have stretched the metal or maybe someone kept kicking it. East coast bus, snow on shoes, who knows.
Tried the shrinker with a piece of wood attached to it but that broke, and I slammed myself in the nuts.
So not wanting to repeat that pain, I switched to a piece of angle iron.
That helped a little, but the jaws were probably not deep enough to be effective. Ended up cutting that panel at three spots and along with some hammer and dolly work, the 18-20mm space was corrected. Would not weld that finished until the inner dogleg was close to the final fit.
|
|
| Back to top |
|
 |
Kb65single
Samba Member
Joined: July 24, 2019
Posts: 273
Location: Obxnc
|
| Posted: Sat Sep 09, 2023 9:32 am Post subject: Re: Rusty 65 SC restoration |
|
|
Tried the inner dogleg in without the outer dogleg just to see if it would fit in (too small or too big). Made a few adjustments at the b-pillar. The flange that gets welded to the bulkhead panel was not 90 deg. to the top. At the front, the profile of the dogleg did not match the a-pillar.
Then attempted to get the outer piece on. The bumper mount arm attached to the inner dogleg just got in the way. I knew I would be trying this piece in more than I wanted to so it ended up like this. I could put it back on later.
After multiple attempts to fit the inner to the outer, it just wouldn't work. Then decided to see if they would fit together just lying flat on the plywood on the load bed. It was like a teetertotter; contact in the middle and a lot of space on the ends.
Tried them back in. Attempted multiple adjustments that made me come to the conclusion that fitting it in one piece was way too frustrating. Playing Wack-a-mole was getting old. Was the outer dogleg the problem or the inner. That led to cutting it in two. That helped a lot because I could see one obvious problem. The inner dogleg was to wide right in the middle, the outer dogleg seemed like it was the correct width. Got that corrected by adjusting the flange on the outer side of the panel.
Correcting that let me screw the back inner section to the wheel well panel and screw the inner to the outer dogleg with a 19mm seal width and 10 mm seal depth as a guide.
Moving on to the front inner dogleg half....
The profile of the inner dogleg at the bumper mount area wouldn't match the outer unless I moved it to the rear. The 2 drain notches present made changes to that profile difficult. Not wanting to stress the outer panel I made the inner fit the outer. That unfortunately led to cutting the original dogleg in 3 pieces. Moving it back made for a larger space between it and the a-pillar. Corrected that by flattening the flanges and adding new ones.
A few more changes
Now that front section is done, I can fit the middle section. Glad I saved all that money on these doglegs. After removing some of the green paint I found evidence of welding on the inner. They did a good job of matching the green paint.
The middle section required multiple relief cuts and flange adjustments to get it to mate to the front and rear. Keeping the 19-20mm wide and 10mm thick dimensions for the seals gave me some guidelines to follow.
|
|
| Back to top |
|
|
chrisflstf
Samba Member
Joined: February 10, 2004
Posts: 3450
Location: San Diego
|
| Posted: Sat Sep 09, 2023 9:42 am Post subject: Re: Rusty 65 SC restoration |
|
|
| Alot of work, little by little. Looks great! |
|
| Back to top |
|
|
Kb65single
Samba Member
Joined: July 24, 2019
Posts: 273
Location: Obxnc
|
| Posted: Mon Sep 11, 2023 6:39 am Post subject: Re: Rusty 65 SC restoration |
|
|
chrisflstf
Thanks again. Yes, little by little. It will only get done, if you do it.
After crawling inside the wheel well a thousand times the bottom outer skin of the outer dogleg wasn't parallel to the b-pillar. It was parallel until the bottom third then started to flair out. The black line on the b-pillar is where it was parallel.
Made a cut and welded it to draw the flair inward. Looks a whole lot better.
Some little spots that needed attention. Fillin a hole on the inner dogleg.
Move the location of the hole that the bumper bracket goes through.
A few drain holes (top and bottom) made with a carriage bolt and a round pipe.
Finish weld and grind the inner dogleg.
Paint the inside cavity before welding them to the body.
Weld the inside of the outer dogleg at the b-pillar 6 inches down from the door opening first. Then reassemble the inner an outer and weld them together and to the bus.
Can't wait to start the other side  . I was reading in the " what are the best aftermarket panels " section in the forums. The early Gerson doglegs did not get a whole lot of praise from those who tried to fit them. Even the WW early versions were a challenge. I think I chose poorly. I think I got a first-generation Gerson dogleg, but I will never know. Hopefully I will be surprised on the passenger side. . I was reading in the " what are the best aftermarket panels " section in the forums. The early Gerson doglegs did not get a whole lot of praise from those who tried to fit them. Even the WW early versions were a challenge. I think I chose poorly. I think I got a first-generation Gerson dogleg, but I will never know. Hopefully I will be surprised on the passenger side.
|
|
| Back to top |
|
|
Walk Thru KO
Samba Member

Joined: August 14, 2003
Posts: 156
Location: North Carolina
|
| Posted: Mon Sep 11, 2023 8:34 am Post subject: Re: Rusty 65 SC restoration |
|
|
I'll say it again - you do great work, you're very skilled and diligent to get it right, that is done as it should be.
I wish you could somehow get a CAD drawing of each of these panels you've had to modify as I believe the adjustments/corrections you're creating make for a better fit of the replacement panel to the original frame/body/panels.
Ideally, the drawing could even include the location for the numerous holes for the plug welds so future available replacement panels could be ready to correctly fit and weld up. There's no reason replacement panels can't fit better and you are just the man that has worked out correct fitment on so many of the panels on this truck. There is a market for such a panel where you cut out the old and weld up the perfectly fitting replacement. |
|
| Back to top |
|
|
Kb65single
Samba Member
Joined: July 24, 2019
Posts: 273
Location: Obxnc
|
| Posted: Mon Oct 23, 2023 7:01 am Post subject: Re: Rusty 65 SC restoration |
|
|
Walk Thru KO
Thanks for the comments sorry for the delay, non-VW list was getting too long. Yes, it would be great to have replacement panels with no adjustments. I'm sure Mr. Gerson wishes that every day and he has made things right with me most of the time. The really obvious glaring problems need to be fixed by the product producer. The subtle things are probably caused by the individual vehicle (rust, wrecks, potholes, high milage the list is long). The only way we will get good panels is if we give good feedback to the producers so that they can update their manufacturing processes. From what I've read, the newer dogleg panels fit a whole lot better because WE brought it to the attention of the producers. I wish I bought the newer version, but I didn't.
Started on the passenger side dogleg with the hope that it fits better than the driver's side. A rare non humid day in July came up so I took advantage of it and sandblasted the dogleg pieces. Applied Eastwoods Afterblast.
Cut out the front facing section of the 3 piece a-pillar so I could fit the same Gerson replacement. Doing it this way helped with the alignment.
Dissected the hinge side of the Gerson replacement.
Cut the door rubber seal flange to make room for the hinge side of the a-pillar Gerson replacement.
Removed the front half of the original dogleg.
Repaired the rust hole on the headlight support panel.
Fit the hinge side of the a-pillar.
Coat the inside.
Then weld it in.
|
|
| Back to top |
|
|
Kb65single
Samba Member
Joined: July 24, 2019
Posts: 273
Location: Obxnc
|
| Posted: Fri Oct 27, 2023 11:49 am Post subject: Re: Rusty 65 SC restoration |
|
|
With the two a-pillar pieces welded together it was time to fit the dogleg.
Got the inside dogleg screwed to the wheel well panel with a 10mm depth for the door seal.
The outside and inside dogleg pieces had some challenges. The outside was way too wide at the b-pillar and didn't mate up well with the inner.
With my driver's side experience, I decided to cut the outer in half and get that fit first.
The b-pillar side of the outer dogleg had a bow on that side....
and my b-pillar wasn't 90deg to the bottom of the door....
Made the outer dogleg thinner at the b-pillar (where the drain hole should be) and had to widen both the inner and outer doglegs where I cut the outer in half. With the dogleg pieces matching the outside contour of the bottom of the closed door, I cut the outer dogleg to match the b-pillar.
Welded that together by screwing the dogleg flange to the bus b-pillar and clamping some straight metal on the outer skin. Now this section of the dogleg fits the b-pillar, and it has a good gap at the bottom of the door. Getting there.
|
|
| Back to top |
|
|
70bus 
Samba Member
Joined: July 15, 2004
Posts: 581
Location: P.O.
|
| Posted: Fri Oct 27, 2023 1:14 pm Post subject: Re: Rusty 65 SC restoration |
|
|
Sometimes i think you should buy a professional brake and some sheet steel. You have the skills and it might go quicker!
_________________
Craig K
70 Neunsitzer
65 Pritschenwagen
"If Von Dutch was alive, he'd walk in there with a pistol and shoot these people."
-Robert Williams |
|
| Back to top |
|
|
Kb65single
Samba Member
Joined: July 24, 2019
Posts: 273
Location: Obxnc
|
| Posted: Sat Oct 28, 2023 6:10 am Post subject: Re: Rusty 65 SC restoration |
|
|
70bus
Sometimes I think I should have bought an original paint rust free bus but then I would be missing out on all this fun.  Thanks for your comments and my next post partially proves your reply. It's like you read my mind. Thanks for your comments and my next post partially proves your reply. It's like you read my mind.
Widening the outer dogleg in the middle (where I cut it) made the flange that mates to the inner thinner and thinner. (picture shows a really narrow flanges)
I would eventually have to add something to that back half flange so that it would be easier to weld to. Not wanting to do that to the front half I made a new improved section. (thanks, 70bus) Bent a proper flange 90deg and used the shrinker/stretcher to follow the wheel well contour.
Had to make a few cuts on the "shelve" part to allow that to follow the angle of the back half.
As you can see by the pictures the dogleg ended up in three pieces. The front trird needed minor recontouring and proper flanges at the a-pillar.
Used the original outside portion of the now middle section to complete the dogleg.
Had to fill the gap between the back and middle section with the metal I bent for the driver's side.
Then fit and welded the original middle section.
Now the outer section of the dogleg follows the contour of the door, and the door seal measurements are correct. Getting there (a little more).
|
|
| Back to top |
|
|
BarryL
Samba Member

Joined: November 01, 2004
Posts: 14274
Location: Casa de Oro, California
|
| Posted: Sat Oct 28, 2023 6:34 pm Post subject: Re: Rusty 65 SC restoration |
|
|
| Master engineering feat. |
|
| Back to top |
|
|
Kb65single
Samba Member
Joined: July 24, 2019
Posts: 273
Location: Obxnc
|
| Posted: Fri Nov 03, 2023 8:40 am Post subject: Re: Rusty 65 SC restoration |
|
|
BarryL
Thanks, being stubborn and too far into it to stop helps 
.... and if the outer dogleg needed to be wider the inner followed suit. I tried to stretch the flange that mates up with the skin of the outer dogleg, but the flange was getting too thin to punch holes for plug welding. Marked a line and removed sections in those areas and widened from the dogleg cut in half line to where the cab floor starts. Shrinker/stretcher tool came in handy again, love that tool.
Made some drain holes.
Painted the cavities that will be hidden when things are assembled.
Welded the outer dogleg on the b-pillar 6 inches down, then painted that area.
Assembled the dogleg half's and welded the sections to themselves and to the bus.
Made a drain hole on the inner dogleg right at the b-pillar. Since I was letting water in at the top, it made sense to let it out at the bottom.
Lots of grinding later and my half-priced doglegs were in. Note to self: No one sells stuff for half price without a reason. Inner and outer valances, a-pillar bottoms and lower 6 inches of the front nose skin next.
|
|
| Back to top |
|
|
Jm13004
Samba Member
Joined: May 23, 2017
Posts: 20
Location: Florida
|
| Posted: Wed Jan 10, 2024 5:46 am Post subject: Re: Rusty 65 SC restoration |
|
|
| Wow! You've done an enormous amount of metal work on this bus. Love how you take no shortcuts to get it right. Your documentation is superb.....thanks for sharing the journey. |
|
| Back to top |
|
|
Huetti_1989
Samba Member

Joined: February 13, 2011
Posts: 1136
Location: Austria
|
|
| Back to top |
|
|
Kb65single
Samba Member
Joined: July 24, 2019
Posts: 273
Location: Obxnc
|
| Posted: Wed Jan 10, 2024 7:39 am Post subject: Re: Rusty 65 SC restoration |
|
|
| Jm13004 wrote: |
| Wow! You've done an enormous amount of metal work on this bus. Love how you take no shortcuts to get it right. Your documentation is superb.....thanks for sharing the journey. |
Jm13004
Thanks for your comments. I really do enjoy the metal work part of it. It is a long journey and there are days that can be frustrating. After those doglegs I needed some time to reenergize, but I am starting to get back at it. Hopefully your bus doesn't need as much metal work as mine did.
Ken |
|
| Back to top |
|
|
Bulli Klinik
Samba Member

Joined: January 16, 2005
Posts: 2080
Location: Bulli Klinik, Colorado Springs
|
| Posted: Wed Jan 10, 2024 8:34 am Post subject: Re: Rusty 65 SC restoration |
|
|
Nice, clean work. It can be a struggle sometimes...
Are you using a brush-on, weld-thru primer? What brand are you using and do you clean the weld spots prior to welding? Your rosette welds look nice and tidy.
_________________
I've never met a Bus I didn't like.
Mike K
Bulli Klinik
Colorado Springs |
|
| Back to top |
|
|
Kb65single
Samba Member
Joined: July 24, 2019
Posts: 273
Location: Obxnc
|
| Posted: Wed Jan 10, 2024 9:17 am Post subject: Re: Rusty 65 SC restoration |
|
|
| Huetti_1989 wrote: |
Good work on that Doglegs, thats a lot of work!
did you have a nice gap inside where the seal channel meets the door when it is closed?
what seals are you using?
do you tryed them?
-Christian |
I will agree with you that it is indeed a lot of work.
The gap between the door and the wheel well panel was consistent but varied from driver's door to passenger door. I don't know if it was because the driver's door was not original to the bus. I did not change any of the metal of the wheel well panel and kept a 10mm depth for the seal.
The seals that I bought were from Wolfsburg West. A dense kind of foam, light gray in color.
I did try them in, and they did seem to "seal" the door to the bus. I did not get the feeling that the seal was pushing the door out excessively. I'm sure I will have to adjust some areas by shimming them out or trimming them in when the bus is in paint. They seem to need a break in period when they are brand new.
Nice job on you 21 window conversion. Now that was a lot of work.
Ken |
|
| Back to top |
|
|
Kb65single
Samba Member
Joined: July 24, 2019
Posts: 273
Location: Obxnc
|
| Posted: Thu Jan 11, 2024 6:02 am Post subject: Re: Rusty 65 SC restoration |
|
|
| Bulli Klinik wrote: |
Nice, clean work. It can be a struggle sometimes...
Are you using a brush-on, weld-thru primer? What brand are you using and do you clean the weld spots prior to welding? Your rosette welds look nice and tidy. |
Bulli Klinik
I do not use weld-thru primer. All of the holes for my plug welds are 3/16". The brush paint that I use on all of the cavities, or the mating surfaces is Eastwoods Encapsulator Plus. I keep bare metal approximately 2mm from the back side edge of the 3/16" holes when I paint. The front side of the hole should have a wider coating free zone. When I finalize the fit of the panel, the 3/16" holes are marked with a fine point Sharpie marker. Then I can remove any paint or surface rust/contamination in that area and 2-3mm beyond. If the surfaces are sandblasted, I mark the holes with the Sharpie and paint 2-3mm around it. Since I am Mig welding with Argon/CO2 mix, I just don't trust any coating or rust in the weld area, I know what happens when it is present, the welds suck. They spatter and crackle and are porous. Thanks for the complement, "Nice and tidy" is what I'm looking for in my welds, it makes me happy when I see them, and I trust that they are good. 
Ken |
|
| Back to top |
|
|
Bulli Klinik
Samba Member
Joined: January 16, 2005
Posts: 2080
Location: Bulli Klinik, Colorado Springs
|
| Posted: Thu Jan 11, 2024 8:04 am Post subject: Re: Rusty 65 SC restoration |
|
|
Likewise, I dislike working with weld-thru primer. One thing I have learned recently is that if I crank up the MIG gas, I get a MUCH better weld when using it. I tried using zinc galvanizing spray from Rustoleum as the last can of weld-thru I bought was $50. It was such a splattering mess that I bough another can of of the $50 stuff. I'd prefer not to use it as it takes more time and money, but much of the work I do involves seam rust repairs.
We work very similarly. I prefer to repair and metal finish than replace.
_________________
I've never met a Bus I didn't like.
Mike K
Bulli Klinik
Colorado Springs |
|
| Back to top |
|
|
chrisflstf
Samba Member
Joined: February 10, 2004
Posts: 3450
Location: San Diego
|
| Posted: Thu Jan 11, 2024 8:52 am Post subject: Re: Rusty 65 SC restoration |
|
|
| Quote: |
| One thing I have learned recently is that if I crank up the MIG gas, I get a MUCH better weld |
I just discovered this also. I had always set the gas to 20 cu ft, but would get these crater , porous welds, occasionally. I set the gas to 23 and havent had one since |
|
| Back to top |
|
|
Bulli Klinik
Samba Member
Joined: January 16, 2005
Posts: 2080
Location: Bulli Klinik, Colorado Springs
|
| Posted: Thu Jan 11, 2024 4:16 pm Post subject: Re: Rusty 65 SC restoration |
|
|
Same.
_________________
I've never met a Bus I didn't like.
Mike K
Bulli Klinik
Colorado Springs |
|
| Back to top |
|
|
|


