| Author |
Message |
DUNGBTL 
Samba Member
Joined: October 17, 2022
Posts: 126
Location: Ashland, OR

|
 Posted: Tue Nov 07, 2023 6:15 pm Post subject: The DUNGBTL Build Posted: Tue Nov 07, 2023 6:15 pm Post subject: The DUNGBTL Build |
 |
|
Doing restomod on 72 SB
The DUNGBTL. Long time hobbyist car builder/restomodder and have done many cars in the past
64 AH Sprite, 63 KG, 69 912, 84 911 Carrera, 90 LX 5.0L Notch, 91 300ZX TT, 06 Lotus Elise, 86 CRX Si, 87 Civic Si, to list a few.
Hands down the Porsche marque (356/911/912s) cars are my all time favorites. And all my past builds have been all performance orientated (track, i.e., drivers training, and local AX)
however I did concours the 912 and 911 w/the local PCA club, so theres that. The plan for the DUNGBTL is the same, make it suitable for a casual track day or local AX session and be presentable to take to car shows and cars n coffees. I mention the love affair w/vintage Porsches because thats the styling and form follows function slant I will be going for.
Searched for few months for a suitable candidate. Decided on a flat windshield SB because they still have the classic dash under the fugly pad, more room in the frunk for the activities I have planned, and theyre less money to procure. After looking at half a dozen, I found the perfect candidate sitting in a field in Colfax CA. The owner had passed away and the property owner was looking to clear his property of the deceased's junk! After several weeks of phone negotiations (very stubborn seller) I rented an UHAUL truck and trailer (lots of spares went with the car) and traveled from Ashland OR down to Grass Valley (Colfax) CA to pick it up.
The perfect candidate for my project because it was cheap and had zero structural rust. Engine was out of the car (came with) but was a roller.
Originally I was planning a T4 914 motor in keeping with the vintage Porsche theme, however with more R&D into that and alternative engines
didnt want to do a T1 due to unfavorable $/HP ratios
I found the T4 choice had even higher $/HP ratios. I decided on a 165 HP Subaru EJ25 as the engine (hence the larger Frunk and AC grill of the 1302 SB!). A reliable 165 HP right outta the box, new millennium FI and engine management, plentiful and cheap! Whats not to like! Yea, yea, it not AC and so much for the Porsche theme, but hey, at least its still a flat 4!
Anyway
will be documenting the build here. Im already a year & a half into it so, Ill be posting what Ive already done (I have lots of pics).
BTW, if any of you were into gen 3 Civics back in the day, I was KAKABOX on RedPepperRacing.com!  |
|
| Back to top |
|
 |
MajorPIle
Samba Member
Joined: February 15, 2021
Posts: 16
Location: CA
|
| Posted: Wed Nov 08, 2023 1:31 pm Post subject: Re: The DUNGBTL Build |
|
|
Sounds like it will be a cool build. I am working on a 73 standard myself, but I am trying to develop the same build philosophy related to Porsches. I particularly love the 911/912s with steelies. I just went to Rennsport 7 last month and that really inspired me.
I don't know how to describe the look I want other than "street stock", but "casual track day or local AX session and be presentable to take to car shows and cars n coffees" is pretty darn close.
I really want to have the same width and diameter front and rear tires and lowered just over the wheels to get something different from the slammed look and narrowed front beam look.
What are you plans for spindles/beam and wheel tire combos? And for the casual AX plan, what are you going with for shocks and sway bars?
Looking forward to following this build! |
|
| Back to top |
|
|
Buggeee
Samba Member
Joined: December 22, 2016
Posts: 4427
Location: Stuck in Ohio
|
|
| Back to top |
|
|
DUNGBTL
Samba Member
Joined: October 17, 2022
Posts: 126
Location: Ashland, OR
|
| Posted: Wed Nov 08, 2023 6:26 pm Post subject: Re: The DUNGBTL Build |
|
|
| Quote: |
| Sounds like it will be a cool build. I am working on a 73 standard myself, but I am trying to develop the same build philosophy related to Porsches. I particularly love the 911/912s with steelies. I just went to Rennsport 7 last month and that really inspired me. |
I saw pics from R7 and it looked very cool. Wish I had gone! Back when I was in PCA I went to a Parade in Portland OR. Met Peter Porsche
saw Mark Donohues 917
it was all just sensory overload, in a good way! R7 looked similar.
Funny you should mention the vintage Porsche steelies
the old 15x4.5 wheels
I also like those (the Fuchs are just overplayed currently imo). I was watching a Magnus Walker OPP video on a restomod 912 using 356 styling cues and details. The car had what looked like the 911 steelies
turns out they are reproductions done in light weight aluminum alloy! And they were 16s! Magnus was equally curious about them and asked the owner what kind they were. They are Group4Wheels out of the UK. I went on their website: https://www.group4wheels.com/store/16-LMZ-Aluminium-Steels-c127677601 and ordered a set of 16x6 and 7s! ETA is December!
I talked to Jon Chabot owner of TopLine Parts about whether he thought the wheels would fit a 72 SB under the stock fenders and he said they would
using 205/55-16 tires on the 6s and 225/50-16 on the 7s rear. Cool thing about those wheels and tire sizes are
1) they are very close to the same rolling dia as the OEM SB wheel/tires, 2) their rolling diameters and sidewall heights are the same front and back (24.9 with 4.4 sidewalls), and 3) they are the same size wheels/tires that Porsche offered on the 80s 911 Carreras! So theyre still plenty of performance tires in those sizes to choose from! Its win, win, win!
Im not sure if these would fit a beam front end of a standard. Someone on Samba probably knows. Yea, Im not a fan of the narrowed beam look
doesnt look right to me.
The SB has a strut front suspension so Ill be using TopLines Maxx adjustable height coil-overs/struts and their other offerings for a lowered SB. Things like lca bushings and larger front stabar that helps correct the caster and camber when lowering. Ill measure the bump steer and probably fab my own correction parts. In the rear probably slightly larger T-bars, Koni adj shocks and some sort of low stiction bushings for the diagonal arms
not quite sure yet. Need to research the rear more. Wilwood disc brakes all around w/a 5x130 Porsche BCD natch! 
The chassis will be stiffened by a 6pt removable roll cage w/welded on mounting plates (currently in work
will post it all) and a 6pt CoolRides Kafer bar (which is bolted to the under plate of the roll cage rear diagonals
.again, Ill post a whole thing about that install
a what a royal PITA that was to install!  ). ).
Anywhoooo
thats whats in the works!
Buggeee:
Yea
the better handling, improved turning radius is another reason I went w/a SB for this build (and they have more room in the frunk for activities!) The AH Sprite was my 1st car! Unbeknownst to me, it was a real POS and at the time I had no mechanical experience on cars or money
.so I had to learn to fix/restore it! And that experience motivated me to go back to school and get my Mechanical Engineering degree! I blame it all on that Sprite! 
Cheers! J. |
|
| Back to top |
|
|
vamram
Samba Member

Joined: March 08, 2012
Posts: 7313
Location: NOVA
|
| Posted: Thu Nov 09, 2023 6:23 am Post subject: Re: The DUNGBTL Build |
|
|
 Love me a Gentian Blue '72 Super Save! Love me a Gentian Blue '72 Super Save!

_________________
Eventually, "we are what we pretend to be.
Give peace a chance - Stop Russian-Soviet Aggression!!
'74 Super 9/16 - present, in refurb process.
'73 Super - 6/18 - Present - Daily Driver!
'75 Super Le Grande...waiting it's turn in line behind '74.
Click to view image
Save the Supers!! |
|
| Back to top |
|
|
DUNGBTL
Samba Member
Joined: October 17, 2022
Posts: 126
Location: Ashland, OR
|
| Posted: Thu Nov 09, 2023 8:51 am Post subject: Re: The DUNGBTL Build |
|
|
Nice! Thats a good looking SB!
Unfortunately the DUNGBTL exterior paint is not the original Enzian or Gentian Blue (a one year only color for 72 beetles) but an old repaint (only one!). Car does have some very cool patina, esp the roof, which I have enhanced. The interior is all original paint and in very good condition.
I removed the fenders (doing something different with those) and color sanded (1500) and polished the exterior to enhance the patina. I do not plan on painting the exterior (fenders yes, have plans for the fenders/bumpers). Doing a polished patina look using only color sanding, polish and wax, no sauce.
FWIW, I found that Euro color standard RAL 5010 is almost an exact match for my Gentian blue. Its much cheaper to buy a standard color than a factory specific mix. Ill be painting the some of the interior, touching up the frunk and engine bay with this.
The RAL 5010 rectangle is on the left
Rustoleum pure blue on the right.
J. |
|
| Back to top |
|
|
vamram
Samba Member
Joined: March 08, 2012
Posts: 7313
Location: NOVA
|
| Posted: Thu Nov 09, 2023 10:13 am Post subject: Re: The DUNGBTL Build |
|
|
| DUNGBTL wrote: |
Nice! Thats a good looking SB!
|
Thanks! Sadly, I sold it in May 2018, and I think it was later stolen from the lady who bought it. I found it by chance on ebay market place a couple of years ago and when I contacted the seller (different person than my buyer) to get an in person look, after a bit of hemming and hawing the guy blocked me and the ad disappeared from FB. But I digress...
| DUNGBTL wrote: |
The RAL 5010 rectangle is on the left
Rustoleum pure blue on the right.
J. |
Nice! Who did you buy the paint from?
_________________
Eventually, "we are what we pretend to be.
Give peace a chance - Stop Russian-Soviet Aggression!!
'74 Super 9/16 - present, in refurb process.
'73 Super - 6/18 - Present - Daily Driver!
'75 Super Le Grande...waiting it's turn in line behind '74.
Click to view image
Save the Supers!! |
|
| Back to top |
|
|
DUNGBTL
Samba Member
Joined: October 17, 2022
Posts: 126
Location: Ashland, OR
|
| Posted: Thu Nov 09, 2023 12:24 pm Post subject: Re: The DUNGBTL Build |
|
|
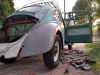
After removing the pile of personal belonging from the deceased owner, I stripped the car of interior, all glass (all original except for windshield), front suspension, gas tank and wiring rats nest.
It looks like the master cylinder was leaking so I cleaned that area up and treated it w/rust converter
then I went to the opposite end and cleaned the undercoating(?) from the eng bay to reveal the true Gentian Blue color!
While I was back there, to make installing the EJ25 Subie engine easier, I drilled out a few dozen spot welds (or so it seemed) and made the rear apron removable
I cleaned up the apron (underside
this is a patina build, remember!  )
undercoated (Wurth), and painted (using my favorite chassis paint: catalyzed Rustoleum Satin Black). Then packed it up for storage for install at a later date! )
undercoated (Wurth), and painted (using my favorite chassis paint: catalyzed Rustoleum Satin Black). Then packed it up for storage for install at a later date!
Of course this wasnt done all in one day. Ive been at this for a year and 1/2 and have hundreds of pics
Im just trying to catch you guys up!
Cheers, J. |
|
| Back to top |
|
|
MajorPIle
Samba Member
Joined: February 15, 2021
Posts: 16
Location: CA
|
| Posted: Thu Nov 09, 2023 1:52 pm Post subject: Re: The DUNGBTL Build |
|
|
| DUNGBTL wrote: |
I saw pics from R7 and it looked very cool. Wish I had gone! Back when I was in PCA I went to a Parade in Portland OR. Met Peter Porsche
saw Mark Donohues 917
it was all just sensory overload, in a good way! R7 looked similar. |
R7 was also sensory overload, even the parking lot had so many cool Porsches! I got to talk to Rod Emory about a few of his cars which was a cool moment, and there was a Singer there too. I also went to Luftgekult last spring which was equally incredible.
I think the guy that did that 356 inspired build either used to or still works at Singer. Pretty cool build for that guy. I love those wheels but they're pricey! Especially compared to what Mobulwagen offers. I'll need to do some more research on the standard and lowering, wheel spacers, and wheel tire combo, etc.
Sounds like you have an incredible build going on, keep the pictures and updates coming in! I'm removing the body from the frame on mine this weekend and kicking off the cleanup and prep on the pan and then body work. Maybe I'll start a build thread too. |
|
| Back to top |
|
|
DUNGBTL
Samba Member
Joined: October 17, 2022
Posts: 126
Location: Ashland, OR
|
|
| Back to top |
|
|
DUNGBTL
Samba Member
Joined: October 17, 2022
Posts: 126
Location: Ashland, OR
|
| Posted: Fri Nov 10, 2023 8:01 am Post subject: Re: The DUNGBTL Build |
|
|
On with the show!
Suspensions typically work better when theyre attached to a structure that doesnt deflect
a stiff chassis. To that end I started my attempts to add some chassis (read: pan & body) stiffness to the DUNGBTL. Started w/the front strut towers. Wire cup brushed (on angle grinder) away 50 yrs of dust and debris from the wheel well and used fire (propane torch) and a paint scrapper to remove the seam sealer from the strut tower doublers. LHS Prepped for stitch welding:
LHS strut tower stitch welded
.stitch welding penetration
I had shoved my car cover (old bed sheet) into the frunk prior to welding. Imagine my surprise when I smelled smoke and flipped my welding helmet up and saw flames! Yup
weld penetration set my cover on fire!  Good thing I was wearing thick welding gloves
clapped the flames out and continued. I did have an extinguisher 3 away Good thing I was wearing thick welding gloves
clapped the flames out and continued. I did have an extinguisher 3 away
Etch primed the welds and wheel well, undercoated (Wurth undercoating) and top coated (catalyzed Rustoleum satin black: 10:4:1, paint:acetone:acrylic enamel hardener)
and etch primed the frunk side
And rinse and repeat for the RHS
Next up
custom strut tower brace fab/install
Cheers,
J. |
|
| Back to top |
|
|
Puppy67
Samba Member

Joined: October 04, 2022
Posts: 221
Location: Bristol, UK
|
| Posted: Fri Nov 10, 2023 9:12 am Post subject: Re: The DUNGBTL Build |
|
|
| Good work. Looking forward to the updates. |
|
| Back to top |
|
|
radstude
Samba Member

Joined: January 29, 2005
Posts: 397
Location: Lynchburg Va.
|
| Posted: Fri Nov 10, 2023 9:14 am Post subject: Re: The DUNGBTL Build |
|
|
Nicely Done!
_________________
1967 VW Fastback (Past)
1971 VW Bug (Past)
1975 VW Bus (Past)
2002 VW Mexican Bug 1600i |
|
| Back to top |
|
|
Buggeee
Samba Member
Joined: December 22, 2016
Posts: 4427
Location: Stuck in Ohio
|
| Posted: Fri Nov 10, 2023 12:07 pm Post subject: Re: The DUNGBTL Build |
|
|
| DUNGBTL wrote: |
| ...Ill measure the bump steer and probably fab my own correction parts.... |
My tie-rods are flipped under the spindle to address this issue, and it works. I think Topline has the bushings for this modification.
The Topline struts, poly bushing corrections and larger sway bar front and rear let the car handle well, stays flat in the twisties.
Strut tower brace, fundamental, is an easy install as well.
The wheel wells look really clean
_________________
1966 Sportsmobile Camper https://www.thesamba.com/vw/forum/viewtopic.php?t=...mp;start=0
72 Super Duper http://www.thesamba.com/vw/forum/viewtopic.php?t=672387
(adopted out) 61 Turkis Pile https://www.thesamba.com/vw/forum/viewtopic.php?t=728764
| SnowDaySyncro wrote: |
| Every setback is an opportunity to learn stuff and to buy new tools. |
|
|
| Back to top |
|
|
Buggeee
Samba Member
Joined: December 22, 2016
Posts: 4427
Location: Stuck in Ohio
|
|
| Back to top |
|
|
agramer1966
Samba Member

Joined: October 17, 2010
Posts: 152
Location: Northern Poland
|
| Posted: Fri Nov 10, 2023 2:08 pm Post subject: Re: The DUNGBTL Build |
|
|
Great mod. I have brand new panels will be doing the same.
_________________
1966 VW1300
1973 VW1302
1974 VW Trike
1984 924
Bunch of old Jap motorbikes
Instagram & YT: #agrameroldoctane |
|
| Back to top |
|
|
DUNGBTL
Samba Member
Joined: October 17, 2022
Posts: 126
Location: Ashland, OR
|
| Posted: Fri Nov 10, 2023 2:12 pm Post subject: Re: The DUNGBTL Build |
|
|
Buggeee:
Thanks for the info! Ive read about the flipping tie-rods trick. Ill keep this in mind when I get to the front suspension. Ive checked out TLs offerings and already have a wish list on the site. Those parts you mention and others are in there!
Most commercial stbs (strut tower brace) leave a lot to be desired, imo. Most all are just a single tube/bars mechanically tied into some bracket mechanically (bolted) attached to the strut tower. Typically they have a pivot at either end which can only transfer axial loads. So, if you imagine the frunk as an open U btwn the struts, any side loads on the tub reacted by the stb can still deflect the strut towers because the stb ends can pivot (tub taking the shape of a parallelogram).
Of course how much this actually occurs depends on the load level. And the stickier the tires, typically more the load transfer. DUNGBTL will use sticky tires, possibly R compound. Ideally you want to triangulate the stb to react that pivot moment and stabilize the open U of the tub. Thats the kind of stb I designed
which is basically a copy of whats been done countless times before. I essentially copied the design of the stb that vintage 911 race cars used back in the day. All in keeping with the vintage Porsche theme of the DUNGBTL! 
Ill post the write-up (w/countless pics ) of my stb in a day or two.
Cheers,
J. |
|
| Back to top |
|
|
heimlich
VWNOS.com

Joined: November 20, 2016
Posts: 6623
Location: Houston, Texas

|
| Posted: Fri Nov 10, 2023 5:45 pm Post subject: Re: The DUNGBTL Build |
|
|
That's nice looking. Make sure to get the foam out from behind the crescents.
_________________
www.vwnos.com [email protected]
Classic Brands. Classic Quality.
Not all parts are made the same. NOS OE/OEM parts made mainly in West Germany, Early Germany, and Early Brazil are where VW produced the best quality parts and best fitting products.
5% Off your order with coupon code: 5%OFF
Restored Distributors Available (<--Click here) |
|
| Back to top |
|
|
DUNGBTL
Samba Member
Joined: October 17, 2022
Posts: 126
Location: Ashland, OR
|
| Posted: Sat Nov 11, 2023 10:47 am Post subject: Re: The DUNGBTL Build |
|
|
Strut tower truss:
To both stabilize the strut tower and frame head, and in keeping w/the vintage Porsche theme, I made a truss in the style of the 70s 911 RSR race cars
I wanted the brace to be welded directly to the tower structure. I started w/1x2x.120 rectangular tubing and whittled out the tower and frame head attachments
w/some fine fettling, I ended up w/these parts
The frame head where the stabar attaches, appears to be cantilevered a bit from the one bolt attachment to the front body structure. IMO, this location of the frame head could benefit w/some stiffening. It appears to me that the stabar on the SB not only functions as a torsional spring (stabar), but also as the fore-aft load reaction member of the lower control arm (lca)! Imo, its attachment could use some reinforcement! To that end, I wanted to have a welded attachment to the strut truss to stiffen by triangulation the strut and frame head structure. Jeeez
lots of words there
on with the slide show!
But first
lets weld a 1/8 doubler on the frame head to capture the stabar attachment inserts:
Then I set the strut tower braces insitu on the towers (after using threaded rod to check for squareness w/the opposite side) and I burned them in (as all the cool kids say )
After I had the truss reaction points located, I set about fabbing the bars (tubes). I used strings to represent the centerlines of the bars and measured the tube angles, printed out coping templates for said tubes, coped and fitting the truss together (photo montage time! )
Tubes tacked in place for welding on the bench
Finished welded and bolted in place. Fits perfect, no threaded adjusters required!
The eagle eyed amongst you probably noticed the clevis attachment to the frame head doubler
this of course facilitated the truss attachment. The fitment of these clevises took a an inordinate amount of fiddling to position so that the truss ends fit tight in their slots but could allow the truss to be removed. In the end, all that time and fiddling was worth it as the truss fits right and tight but can be easily lifted out!
For the tube ends, I used hydraulic ram ends found on Amazon. This took seemly hours of checking dimensions to ensure that they would fit the ID of the tubes, have the width to fit my clevises/brackets and have a large enough hole for a structural fastener! Phewww
another run-on sentence! In the end, I did have to turn down the OD of the ends using my drill lathe . I fined tuned the OD to be an interference fit w/the ID of the tubes. Froze the fitting and heated the tube ends to slip them in. Used 3 rosette welds (120* apart) to secure)
theyre not going anywhere!
So thats the DUNGBTL strut tower/frame head truss! And yea, I cut a huge gapping hole in the frunk Thats for the water-pumper flat fours cooling system (yes
its a Subaru EJ25 swap). Ill cover that probably in the next post.
Cheers,
J |
|
| Back to top |
|
|
stagewex
Samba Member
Joined: November 17, 2021
Posts: 166
Location: New Rochelle, New York
|
| Posted: Sat Nov 11, 2023 5:02 pm Post subject: Re: The DUNGBTL Build |
|
|
Incredible work you are doing there.
Too bad you were not one of the VW Engineers 50-75 years ago. I'll bet your work would have withstood the passing of time. |
|
| Back to top |
|
|
|


