| Author |
Message |
Epilog79
Samba Member
Joined: June 04, 2009
Posts: 220
Location: Tigard,Oregon

|
 Posted: Thu Nov 30, 2023 9:13 am Post subject: Re: 1975 Beetle Convertible Resto/Mod Build-Chop,Dash,Suicide,Shave. Posted: Thu Nov 30, 2023 9:13 am Post subject: Re: 1975 Beetle Convertible Resto/Mod Build-Chop,Dash,Suicide,Shave. |
 |
|
Every step forward is a step forward. Even though there are "recalculations" you are making steady progress. We are all in awe of your craftsmanship and creativity for this project. You need to post a before shot again to remind us and yourself how far you have come.
Life gets busy and our daily lives get in the way of our fun. I'm still trying to finish a deck project that has been going on since March. Patience is winning. |
|
| Back to top |
|
 |
VW_Jimbo 
Samba Member

Joined: May 22, 2016
Posts: 10043
Location: Huntington Beach, CA
|
| Posted: Thu Nov 30, 2023 9:23 am Post subject: Re: 1975 Beetle Convertible Resto/Mod Build-Chop,Dash,Suicide,Shave. |
|
|
Looking like progress! Keep chipping away at it! It has come a long, long, LONG ways!
_________________
Jimbo
There is never enough time to do it right the first time, but all the time necessary the second time!
| TDCTDI wrote: |
| Basically, a whole bunch of fuckery to achieve a look. |
| 67rustavenger wrote: |
GFY's Xevin and VW_Jimbo!  |
|
|
| Back to top |
|
|
MACJELLY58
Samba Member

Joined: September 26, 2014
Posts: 402
Location: HONOLULU, HAWAII
|
| Posted: Wed Dec 06, 2023 8:22 pm Post subject: Re: 1975 Beetle Convertible Resto/Mod Build-Chop,Dash,Suicide,Shave. |
|
|
Howzit EPI, I keep trying to remind myself that, I indeed am making progress. Sometimes you just gotta take a step back and assess. I still wish my work would be faster. Talk about dedication...working of a Deck in the winter, in Oregon? CRAZY!
Thanks again, Bruddah JIMBO. I'm sure you don't know how many enthusiasts you inspire with the, "Chipping away" ethic. I see you just going and going and going. It gets me to the garage more often than not. I can't wait to see that Baby Window in the end!! Talk about progress!!
In the name of, "progress", I made a little on my days off. It's weird, every time I get in the middle of a brain tasking project, life gets active. Overtime !! The money's good and it is the season(bills), but...time is precious. Oh well.
So, I put everything back together for another test with the adjustments and the Bumper seals.
I guess with the slope of the '75 rear fenders, there is more surface area for the seals to cover. I had to elongate the openings to accommodate the brackets. Original on the left and the modified on the right.
I was finally satisfied with everything. It's not perfect, but neither are my skills. I finalized a few things I had missed, missing chunks and gashes in the mounts. Then, painted the inside of the mounts and the rear clip with the POR. Leaving the edges where I will be welding. I sprayed some Weld through primer there.
Then got to welding that thing in place. I planned on not grinding the welds...going for strength over beauty. So, I tried my best at the welding. I went slow, about two inches at a time. Kept the the seam clean and cooled down. I guess they came out alright.
Despite my efforts, I still haven't gotten the hang of welding upside down!!
That's one of the big reasons why I want to get this Bug on a Rotisserie. But, I gotta get the Bumper brackets on first.
Oh Man!! Maybe I can fix the welds later.
I let the POR dry overnight. That's the bummer with the POR, it's pot life is terminal. But, I'm able to get another day or two with the plastic wrap and refrigerator trick.
Painted the rest and was able to use the little bit extra on the welds in the trunk where the apron attached. Also the sides of the apron front and back, as well as, anywhere else I could find. Damn that stuff is expensive !!
Thanks again for looking. I got Overtime again this weekend, so I'll have to see what progress I make. |
|
| Back to top |
|
|
MACJELLY58
Samba Member
Joined: September 26, 2014
Posts: 402
Location: HONOLULU, HAWAII
|
| Posted: Wed Dec 06, 2023 8:27 pm Post subject: Re: 1975 Beetle Convertible Resto/Mod Build-Chop,Dash,Suicide,Shave. |
|
|
Wow! I totally spaced and forgot to insert the finished photos.
There we go, Hah! |
|
| Back to top |
|
|
VW_Jimbo
Samba Member
Joined: May 22, 2016
Posts: 10043
Location: Huntington Beach, CA
|
| Posted: Thu Dec 07, 2023 9:06 am Post subject: Re: 1975 Beetle Convertible Resto/Mod Build-Chop,Dash,Suicide,Shave. |
|
|
Inspirational! Bruddah, that came out great! Very nice! And the welds look good. Yep, welding upside down is really hard. There has to be a good trick. Even if you just jacked up that side of the car, so it was up on an angle may have made it a bit easier, but
.. those are just hard to do. You saw what I did. I could not handle the drops of molten steel hitting the welding shirt anymore. It just scared the shit out of me, making my attention detour during the welding, causing all kinds of issues. Not good stuff! It was on THAT DAY the Rotisserie became the focal point!
Do your best! You make it all work in the end, or remove that rear quarter panel. Set it up on the bench, weld that bumper mount on. Then take the quarter panel section back over to the car, set it up. Tack it in, adjust it, then weld away, reattaching it to the car! 🤪 You know I am joking!
Dont work too much or you will not get any Bug time. Gotta have the Bug time!
🤙🏻
_________________
Jimbo
There is never enough time to do it right the first time, but all the time necessary the second time!
| TDCTDI wrote: |
| Basically, a whole bunch of fuckery to achieve a look. |
| 67rustavenger wrote: |
| GFY's Xevin and VW_Jimbo! |
|
|
| Back to top |
|
|
Buggeee
Samba Member
Joined: December 22, 2016
Posts: 4435
Location: Stuck in Ohio
|
|
| Back to top |
|
|
MACJELLY58
Samba Member
Joined: September 26, 2014
Posts: 402
Location: HONOLULU, HAWAII
|
| Posted: Sun Jan 14, 2024 10:33 pm Post subject: Re: 1975 Beetle Convertible Resto/Mod Build-Chop,Dash,Suicide,Shave. |
|
|
Hey JIMBO,
You know how much I respect your work and process. While reading your post, I was actually thinking maybe removing and replacing the clip could be the way to go!! After all, that would be way more easy than a lot of what you have done on the Oval so far...
Thanks BUGGEEE,
I'm really pleased with how it turned out. Just wish I was faster...
Well the Overtime at work has dried up and I was able to get a full weekend in on the Bug. Continuing with the rear end, I stripped the Deck Lid, the License plate Light cover and the Hinges/Spring.
The lid had a little surface rust on the inner lower lip and on the other side near the latch. Also, some kind of damage near the "Volkswagen" script.
Stripping the Hinges/"J" Mounts and spring came out alright. But, the License plate Light cover had a surprise, at least for me. It is ABS PLASTIC!!
I never knew that.
I went on cleaning and filling the small rust pitting on the Lid. Not a big deal, however, I had treated the stripped metal with the Phosphorus to get any tiny rust and keep it rust free. I had forgotten to clean it off prior to using the Body Filler. I couldn't get the Filler to feather nicely and it was driving me nuts!
I guess if I didn't do it twice, people would start to think it wasn't me !!
Sprayed the Primer. I forgot to take before pics of the Apron, sorry. I just had to touch up the Tail Pipe fill piece and the joint of the Apron to clip, as I'm using the "Mexican" Deck Lid Seal. Brain wasn't working well, as usual, so I also forgot to spray the Hinges and stuff. Then, I forgot to take finishing pics until after I packed everything up. Well, at least I finished up before the weekend went into the work week. Seeya!
|
|
| Back to top |
|
|
VW_Jimbo
Samba Member
Joined: May 22, 2016
Posts: 10043
Location: Huntington Beach, CA
|
| Posted: Sun Jan 14, 2024 11:52 pm Post subject: Re: 1975 Beetle Convertible Resto/Mod Build-Chop,Dash,Suicide,Shave. |
|
|
Nice update! Everything looks better in primer!
_________________
Jimbo
There is never enough time to do it right the first time, but all the time necessary the second time!
| TDCTDI wrote: |
| Basically, a whole bunch of fuckery to achieve a look. |
| 67rustavenger wrote: |
| GFY's Xevin and VW_Jimbo! |
|
|
| Back to top |
|
|
Buggeee
Samba Member
Joined: December 22, 2016
Posts: 4435
Location: Stuck in Ohio
|
| Posted: Mon Jan 15, 2024 4:39 pm Post subject: Re: 1975 Beetle Convertible Resto/Mod Build-Chop,Dash,Suicide,Shave. |
|
|
| MACJELLY58 wrote: |
I went on cleaning and filling the small rust pitting on the Lid. Not a big deal, however, I had treated the stripped metal with the Phosphorus to get any tiny rust and keep it rust free. I had forgotten to clean it off prior to using the Body Filler. I couldn't get the Filler to feather nicely and it was driving me nuts!
|
Thank you for sharing this.  I have encountered the same issue here and there and never put it together that it was the phosphoric acid. I have encountered the same issue here and there and never put it together that it was the phosphoric acid.
_________________
1966 Sportsmobile Camper https://www.thesamba.com/vw/forum/viewtopic.php?t=...mp;start=0
72 Super Duper http://www.thesamba.com/vw/forum/viewtopic.php?t=672387
(adopted out) 61 Turkis Pile https://www.thesamba.com/vw/forum/viewtopic.php?t=728764
| SnowDaySyncro wrote: |
| Every setback is an opportunity to learn stuff and to buy new tools. |
|
|
| Back to top |
|
|
MACJELLY58
Samba Member
Joined: September 26, 2014
Posts: 402
Location: HONOLULU, HAWAII
|
| Posted: Sun Jan 21, 2024 7:47 pm Post subject: Re: 1975 Beetle Convertible Resto/Mod Build-Chop,Dash,Suicide,Shave. |
|
|
Thanks for checking up on me guys. I appreciate the encouragement. I'm into my 10th year now with this project. Of course I took a lot of time off during the journey. I've found that I gauge my progress in a weird way...by sweeping up the garage after the project workday. I know, right! It started with just a whole bunch of rust in the dust pan. Then, a bunch of steel grinding dust...on to wood dust from the Convertible Bow. I even had the "gold" color from the brass window frame. And then the "Bondo" dust phase in earnest.
This weekend I was gonna move on, but I still forgot about more loose ends. I went to primer the Hinges and Spring for the Engine Lid, because I forgot the last time, when I noticed I totally had forgotten about the rear Fenders! Awwww, man!!
So I started with the small stuff, to now include finishing up the rear Bumper Brackets. Cause yes, I forgot those too. I still needed to cleanup and dress the extensions I welded in there.
A lot of brain farts, because I also forgot I had run out of Epoxy Primer last time. I was too lazy to drive to the paint shop, so I just bought some rattle can "Automotive" primer. It'll do, until I can get off my arse and take the drive.
I finished up with the fenders. Not too aggravating and the primer was alright. Kinda had a few hours after that, so I decided to give the garage a good cleaning and organizing for next time. 
|
|
| Back to top |
|
|
Root_Werks
Samba Member
Joined: December 31, 2007
Posts: 826
Location: San Juan Islands
|
| Posted: Thu Jan 25, 2024 10:05 am Post subject: Re: 1975 Beetle Convertible Resto/Mod Build-Chop,Dash,Suicide,Shave. |
|
|
Some good progress! I like following this thread. Some really good fab work going on.
-Dan
_________________
When I set my timing, why do I flush, then take a pee? |
|
| Back to top |
|
|
MACJELLY58
Samba Member
Joined: September 26, 2014
Posts: 402
Location: HONOLULU, HAWAII
|
| Posted: Fri Jan 26, 2024 10:30 pm Post subject: Re: 1975 Beetle Convertible Resto/Mod Build-Chop,Dash,Suicide,Shave. |
|
|
Thanks Mr. WERKS!
I aim to please. Reading my progress is like slowing down at a traffic accident. You don't want to see the carnage...But, Ya have to LOOK.
Nah, thanks again. Speaking of fabrication, I'd like to welcome you back to the, "We can make that", show.
Next up was sturdying up the dash area, in preparation for the inversion. At the same time I have to make a bracket for the Wiper Motor. The stock set up had a bracket inside the Fresh Air Box, which I deleted. So here we go...
I put the Motor in place using the Blade bolts. I left a couple of tabs for the
reinforcement "bar" when I cut out the stock Sub-Dash.
I took a measurement and walked over to one of my scrap piles. On the top was one of the door reinforcements I was using for the rear Bumper Brackets. That'll do. I cut out a piece that came with a bit extra.
Test fitted that, but the Bug cowl is curved, and it didn't look right. I know..who cares. Then the O.C.D. kicked in. Made some relief cuts and bent it to fit.
It looked pretty cool, kinda like a Japanese "Katana". When I was a young lad, I wanted a Suzuki "Katana" 750cc Sport bike really badly. I had the deal all set up, but my father wouldn't co-sign the loan. Something about killing myself  He was right of course, although he was the one who taught me to ride in the first place. He was right of course, although he was the one who taught me to ride in the first place.
The little bit extra wasn't long enough to reach the mounting of the Wiper Motor. Got another piece of scrap and made an extension. I included the bent up ends and sides to stiffen it up. I not sure if this motor has got any torque to it or not. Probably not, but I'd rather not find out later. Tacked it in and did some test fitting.
That was pretty close. I sprayed some Weld Though on the sandwiched sides and welded that together.
Then another test fit. Looks good, but that was it for the weekend. The yard was calling, well actually SCREAMING! Or maybe that was my Mother In-law. Anyways, I still hadn't made it to the paint store for the Primer. Thanks for looking.
|
|
| Back to top |
|
|
MACJELLY58
Samba Member
Joined: September 26, 2014
Posts: 402
Location: HONOLULU, HAWAII
|
| Posted: Fri Feb 09, 2024 9:46 pm Post subject: Re: 1975 Beetle Convertible Resto/Mod Build-Chop,Dash,Suicide,Shave. |
|
|
Hello All,
Sadly, I had caught a Bug last week(not the VW KIND). Wasn't too bad but the fatigue really sapped all my energy. Better now, so I got back to it. The Support/Wiper mount looked good, but I had to run the motor to make sure that the rotating arm cleared everything. I got it installed and hooked up my jumper box. Thank goodness, it had plenty of room. 
I pulled it back out and was gonna do a rebuild of the motor. But, it ran as smooth as BUTTAH!! I'm just now learning, If It Ain't Broke Don't Fix It!!
It was a bit rusty, so I cleaned it up and gave it a couple of coats of primer and paint.
Before I could install that support, I had to beef up the two corner areas. Especially, the left side that flexed when I closed the hood and created that stress crease in the windshield cowl. I tapped down the crease and got out some square tubing from the replacement garage door opener(I had to buy another motor, after my daughter started a fire in the garage a few years back). Traced my templates onto that and cut them out.
The right side bracket worked out, but the left side was a bust. The existing support is concave and I did not consider that in the initial "plan". I scrapped that design.
I used the shape finder thingy and cut and bent a strip to fit. Then made a new bracket out of a scrap support from the donor car. Did a preliminary test fit of both brackets. In the pic of the left side, the Red Arrow shows the piece from the donor car that I used.
Did another test fit with the curved piece and screwed it all in, nice and tight. So far, so good. Sprayed some Weld Through and put it all together. That took up the whole weekend...Well, I'm getting closer
|
|
| Back to top |
|
|
MACJELLY58
Samba Member
Joined: September 26, 2014
Posts: 402
Location: HONOLULU, HAWAII
|
| Posted: Mon Feb 12, 2024 10:30 pm Post subject: Re: 1975 Beetle Convertible Resto/Mod Build-Chop,Dash,Suicide,Shave. |
|
|
I'm not a betting man and my team was not invited to the Super Bowl. So, I worked on the car instead. Don't get me wrong, I still had a few Adult Beverages 
Plus, I wanted to complete this area, as I was juuust about there. I drilled some Plug Weld holes and sprayed the Weld Through. Then screwed it all into place. Put in the welds and primed it up. It still took me all day. 'Til nextime.
|
|
| Back to top |
|
|
MACJELLY58
Samba Member
Joined: September 26, 2014
Posts: 402
Location: HONOLULU, HAWAII
|
| Posted: Fri Mar 01, 2024 7:20 pm Post subject: Re: 1975 Beetle Convertible Resto/Mod Build-Chop,Dash,Suicide,Shave. |
|
|
I was using the old beat up Grommets to test assemble the Wiper Motor. I didn't want to mess up the new ones doing that. Now that I was done I thought I should test fit the new ones. They were too small.
I couldn't remember where I got them from, so I searched again thinking I got the wrong ones. Ordered new ones and again, they were too small. I was like screw it and took some measurements and ordered them from a site called, "Stein Air", #SA-620. The difference in size is really noticeable.
And here it is in the hole. Nice
On to the next thing! But, I got "Analysis Paralysis" again. Thinking about what should come next. There are a lot of little things that gotta happen. Time was a wasting and I just told myself, Do Something !! So, I started taking stuff off and gathered more Bed Frame "L" channels to make the door supports for the Rotisserie. I cut and clamped them in...looked good. Put some tack welds. Then removed them to weld them up.
I figured I'd give them some paint. If they don't work...at least they will look nice. Now, I gotta think what's next.
|
|
| Back to top |
|
|
VW_Jimbo
Samba Member
Joined: May 22, 2016
Posts: 10043
Location: Huntington Beach, CA
|
| Posted: Sat Mar 02, 2024 12:34 pm Post subject: Re: 1975 Beetle Convertible Resto/Mod Build-Chop,Dash,Suicide,Shave. |
|
|
That looks cool in grey and black! Like a Lego set I had as a kid! Love when you update your thread! Looking forward to more!
_________________
Jimbo
There is never enough time to do it right the first time, but all the time necessary the second time!
| TDCTDI wrote: |
| Basically, a whole bunch of fuckery to achieve a look. |
| 67rustavenger wrote: |
| GFY's Xevin and VW_Jimbo! |
|
|
| Back to top |
|
|
H2OSB
Samba Member
Joined: April 14, 2013
Posts: 1323
Location: Modesto, CA
|
| Posted: Sat Mar 02, 2024 12:59 pm Post subject: Re: 1975 Beetle Convertible Resto/Mod Build-Chop,Dash,Suicide,Shave. |
|
|
So, a couple things. One, your "grill" looks amazing. I didn't read up on what you actually did, but I absolutely love how it looks. I'm thinking you had to replace the valance, and didn't get the valance with the oil cooler/AC condenser slots already it in. Second, I desperately wish I had the skill to duplicate you bumper treatment. I detest the shock absorber bumper brackets (I have a '74) and one way or another, I will run the '68-'73 bumpers on my car. The front is easy. The Mexibeetle style bumper brackets bolt right up and there are D shaped fender grommets with a slot Making it all bolt on. The rear is a different story. The are no fender grommets with a slot. Evening there were, the diamond shaped hole is not located in a good location to accommodate either the factory style brackets or the Mexibeetle brackets. Modding the fenders, and perhaps also the bracket mount on the car is the only way to make it look right.
Anyway, you're doing fine work.
H2OSB
_________________
(o\_i_/o) I'm not a vegetarian because I love animals, I'm a vegetarian because I hate plants. |
|
| Back to top |
|
|
MACJELLY58
Samba Member
Joined: September 26, 2014
Posts: 402
Location: HONOLULU, HAWAII
|
| Posted: Sun Mar 03, 2024 2:55 am Post subject: Re: 1975 Beetle Convertible Resto/Mod Build-Chop,Dash,Suicide,Shave. |
|
|
Wassup Bruddah JIMBO,
I know what you mean. All my LEGOS were, "hand me downs". So, I had a bunch of those grey and black ones. Only a few of the colored ones. I guess that's where my fabrication experience came from. Good to see you're back!
Hey H20SB,
Thanks for checking in on me. I'll save you the head ache and just tell ya. The Valance was a standard one with the grills. The two outside smaller ones are actually a pair of fresh air vents I had deleted. It was a lot of work just to be hidden behind the front bumper. I should really think things through.
And I know what you mean about the Shock Absorber bumpers. All through High School, I hated those. Ya know, in the '80's it was all about the "T" bars up front and there was nothing I could use for my '74 Super!! |
|
| Back to top |
|
|
MACJELLY58
Samba Member
Joined: September 26, 2014
Posts: 402
Location: HONOLULU, HAWAII
|
| Posted: Wed Mar 06, 2024 11:06 pm Post subject: Re: 1975 Beetle Convertible Resto/Mod Build-Chop,Dash,Suicide,Shave. |
|
|
Here's my attempt at a Rotisserie, It's mostly for entertainment purposes. Because, my Rotisserie failed and I wound up with a "Roll-tisserie". Which is alright with me. A little disappointing, but for the prep I put in...I'll call it a win. If you would like real examples with cut lists please check out the threads below from :
VWJIMBO
https://www.thesamba.com/vw/forum/viewtopic.php?t=...;start=820
...and EVIL FIZ
https://www.thesamba.com/vw/forum/viewtopic.php?t=714077&highlight=type++rotisserie
Theses guys know what they're doing!!
Anyway, here we go...
Basically, my thoughts were a "COSTCO" Rotisserie chicken. With the spit running straight through. I was thinking the center of gravity would be lower without the hard top of a sedan, also the heavy Convertible heater channel reinforcement on the bottom. I still had some bed frame scrap to use, although it was getting rather low.
I made another set of bumper brackets.
And then, just started stacking bed frame on that.
A good friend supplied me with some Schedule 40 galvanized pipe for the spinning part. Thanks KEONI !!
I put in corner braces to try and stiffen it up a bit.
Same for the front and a little paint.
Then, a whole day getting that thing off the pan and into the air. It's been while, so I had to Re-remember how. I reassembled the sawhorse, which I guessed would be high enough to get a full rotation. I coulda measured it, but...Nah! Then, I had to find the Strut Tower support thingy, cause those wheels get really floppy once separated from the body.
Annnd...I gave it a try.
Remember that, "Center of Gravity" thing? As it turns out, the Convertible is not as bottom heavy as I thought. It really wants to flip over. I guess a little of Off-set woulda been good. I hung a couple of weights off of the Heater channels and that helped, also some bungees at the corners to assist. Next...the height off the ground coulda been
a few inches higher. The car Juuust can't make it upside down. Thus, it's a "ROLL-TISSREIE". That's alright with me though. Anything over 90 degrees will fit my purposes.
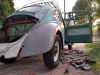
Sorry, I guess I deleted the full side view photo. But, I'm sure I'll have a bunch of those later. Here are the areas that need attention.
Lastly, I fitted a "Lock Plate" at the front. I used a Christmas Reindeer stand. Drilled a hole in the middle and welded that onto the front pipe. Then, made some Lock Pin holes around it, so I can lock the car at angles. Well, that was it. It sure was a lot of work on the Bug, without actually working on the Bug.
At least it only cost me around $80 in Welding wire and gas!!
Alojahs
(I forgot a bunch of crap in the trunk. It all came falling out on the rotation. IT SCARED THE CRAP OUTTA ME!!)
|
|
| Back to top |
|
|
VW_Jimbo
Samba Member
Joined: May 22, 2016
Posts: 10043
Location: Huntington Beach, CA
|
| Posted: Wed Mar 06, 2024 11:56 pm Post subject: Re: 1975 Beetle Convertible Resto/Mod Build-Chop,Dash,Suicide,Shave. |
|
|
Aloha! That looks SWEET Bruddah Jellyman!
LOVING IT! That will make it so much easier on you, your back and thus the work!
You made it to the big leagues! Let the FUN begin!
Seriously though. Welding galvanized steel is not a good thing. Bad stuff can happen to you if you inhale the fumes. Wear protection. Have something that allows the air in the area to be fully evacuated and refreshed. Be careful. No reason to suffer for life, for a spinning Bug!
Here is a brief article on the dangers and safety requirements on welding galvanized steel.
https://www.cmac.com.au/blog/5-things-to-welding-galvanized-steel-safely
_________________
Jimbo
There is never enough time to do it right the first time, but all the time necessary the second time!
| TDCTDI wrote: |
| Basically, a whole bunch of fuckery to achieve a look. |
| 67rustavenger wrote: |
| GFY's Xevin and VW_Jimbo! |
|
|
| Back to top |
|
|
|


