| Author |
Message |
87vanwes
Samba Member

Joined: April 10, 2014
Posts: 204
Location: OBX NC

|
 Posted: Mon Nov 02, 2015 4:20 pm Post subject: 87 Westy Syncro TDI conversion and restoration~lots of pics Posted: Mon Nov 02, 2015 4:20 pm Post subject: 87 Westy Syncro TDI conversion and restoration~lots of pics |
 |
|
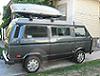
I have lost my mind and may need professional help.
I needed a midlife restoration project and a mustang or corvette is not my style anymore I need utilitarian. So I went back to my old roots VW oh boy.
I bought the westy with the tdi doner car in Va a few years ago from a gentleman who had big plans like me but a devorse slammed on his brakes. I hope that's not a sine like a curse of some kind.
I went one step further and bought a rusty syncro so the engine would fit better.. How about that logic?
Any way I have done a lot but by no means have I mashed the two vans together .
There will be blood and there will be beers
I also want to thank all of the folks who have shared so much info here on the samba. I don't think I could pull this off with out you guys and gals...
My name is Kevin and I live on the outer banks of NC
CHEERS
This is a rust free van that has seen better days all of the bare metal
Is from PO removing the groovy 80s decals
I bought this van in VA beach off the Samba I got it running
And driving great. It has been a blessing to have it driving
So I could test things trans,VC and things like that.
The alh tdi doner wrecked in the rear and it drove as well another good thing.
Last edited by 87vanwes on Fri Nov 27, 2015 2:39 pm; edited 4 times in total |
|
| Back to top |
|
 |
hans j
Samba Member

Joined: May 06, 2006
Posts: 2714
Location: Salt Lake City UT
|
| Posted: Mon Nov 02, 2015 5:07 pm Post subject: |
|
|
Love the ALH! You can look through my thread (in signature) and search some of the other TDI threads, I know I have written about what I would do differently the next time.
_________________
1986 Canadian Syncro Westy TDI - 1989 Syncro Single Cab - 2001 Audi S4 - 1981 VW Caddy ABA - 1980 VW Caddy EV - 1973 VW T-181 |
|
| Back to top |
|
|
Merian
Samba Member

Joined: January 04, 2014
Posts: 5212
Location: Orygun
|
| Posted: Mon Nov 02, 2015 6:21 pm Post subject: |
|
|
I hope you rent and don't own a house on the outer banks of NC - that would be really crazy.
do your old roots in VW include Vanagons ('cuz they have some big differences from any other VW)... |
|
| Back to top |
|
|
ALIKA T3
Samba Member

Joined: July 30, 2009
Posts: 6347
Location: Honolulu,Hawaii and France
|
|
| Back to top |
|
|
87vanwes
Samba Member
Joined: April 10, 2014
Posts: 204
Location: OBX NC
|
| Posted: Tue Nov 03, 2015 6:27 am Post subject: |
|
|
| hans j wrote: |
| Love the ALH! You can look through my thread (in signature) and search some of the other TDI threads, I know I have written about what I would do differently the next time. |
Your thread is a great one. I have been all over it and many others.
Thanks for taking the time to post it. |
|
| Back to top |
|
|
?Waldo?
Samba Member

Joined: February 22, 2006
Posts: 9752
Location: Where?
|
| Posted: Tue Nov 03, 2015 6:47 am Post subject: Re: 87 westy syncro alh tdi conversion lots of pics |
|
|
| 87vanwes wrote: |
| I went one step further and bought a rusty syncro so the engine would fit better.. How about that logic? |
Are you installing the syncro components into the Westy? |
|
| Back to top |
|
|
87vanwes
Samba Member
Joined: April 10, 2014
Posts: 204
Location: OBX NC
|
| Posted: Tue Nov 03, 2015 8:12 am Post subject: Re: 87 westy syncro alh tdi conversion lots of pics |
|
|
| Andrew A. Libby wrote: |
| 87vanwes wrote: |
| I went one step further and bought a rusty syncro so the engine would fit better.. How about that logic? |
Are you installing the syncro components into the Westy? |
Hey Andrew
I am ,the syncro is pretty rusty but has been great as a test platform and lots of parts. You will be glad to know I'm going mtdi you have shared some great info on here. I worked for cat in the marine devision for a long time now I am back in aviation so you will see a lot of influences from both. |
|
| Back to top |
|
|
87vanwes
Samba Member
Joined: April 10, 2014
Posts: 204
Location: OBX NC
|
| Posted: Tue Nov 03, 2015 8:35 am Post subject: |
|
|
So I tore the old girl down to the bare bones all that is left is the dash and steering wheel. It's fun to drive like this but I recommend a pillow.
Last edited by 87vanwes on Tue Nov 03, 2015 1:28 pm; edited 1 time in total |
|
| Back to top |
|
|
?Waldo?
Samba Member
Joined: February 22, 2006
Posts: 9752
Location: Where?
|
| Posted: Tue Nov 03, 2015 8:43 am Post subject: |
|
|
You might have seen where I've posted this elsewhere, in my opinion the Land Rover 300TDI injection pump is pretty much ideal for the ALH. It has the correct nose diameter to fit the ALH bracket. You can use the ALH sprocket and hub which will give the correct offset for the timing belt. To mount it, you can run a tap into the three mounting holes at the sprocket end of the pump and use M10 bolts if memory serves. They are larger than the stock ALH bolts but will just barely fit through the holes in the timing cover/bracket. There are a couple of other minor items to address but it is 99% bolt-on and will outperform a stock ALH eTDI out of the box.
What are your plans regarding the turbo? |
|
| Back to top |
|
|
87vanwes
Samba Member
Joined: April 10, 2014
Posts: 204
Location: OBX NC
|
| Posted: Tue Nov 03, 2015 4:04 pm Post subject: |
|
|
The interior was awful and dirty but there really were not any rips. I found out by trial and error this fabric is tough. I wish I had more photos of doing the panels but it is all done and now resides in the guest bed room.
I don't know why he had a weekender table.
All the plastic and rubber pieces can be removed,heated up and screeched to ther original length and simply glued back on.
It's nice to have things ready to bolt in after the conversion and paint.
Next will be the fridge build its the only cabinet I modified but its cool.
Last edited by 87vanwes on Tue Nov 03, 2015 4:43 pm; edited 2 times in total |
|
| Back to top |
|
|
87vanwes
Samba Member
Joined: April 10, 2014
Posts: 204
Location: OBX NC
|
| Posted: Tue Nov 03, 2015 4:16 pm Post subject: |
|
|
| Andrew A. Libby wrote: |
You might have seen where I've posted this elsewhere, in my opinion the Land Rover 300TDI injection pump is pretty much ideal for the ALH. It has the correct nose diameter to fit the ALH bracket. You can use the ALH sprocket and hub which will give the correct offset for the timing belt. To mount it, you can run a tap into the three mounting holes at the sprocket end of the pump and use M10 bolts if memory serves. They are larger than the stock ALH bolts but will just barely fit through the holes in the timing cover/bracket. There are a couple of other minor items to address but it is 99% bolt-on and will outperform a stock ALH eTDI out of the box.
What are your plans regarding the turbo? |
I did source a land rover pump and did a complete reseal and tweak. I had 11mm pump parts so i had good delivery valves but i did keep the steal housing because it was in better shape witch meant drilling and taping for the support bracket on the alh My goal is not to have a power house but a good dependable engine.
For the turbo ?? That's a great question. I think I have a plan using a dawse valve and possibly a solinoid. In the beginning it may be fixed until its all in and we can experiment. |
|
| Back to top |
|
|
87vanwes
Samba Member
Joined: April 10, 2014
Posts: 204
Location: OBX NC
|
| Posted: Sat Nov 07, 2015 9:01 am Post subject: |
|
|
I will get to the nuts and bolts soon as I am trying to finish up the interior.
This was my score of the year.. 20 dollars on CL in Richmond VA.
Brand new Waeco/Dometic fidge.
It does have the Danfoss compressor.
A little test run next to the microwave I bought for the van.
Time to make it the right color.
And now to make it all fit with some cool mods.
These soft close drawer slides are great for vehicles because they stay
Shut with no latches.
I did not want to face mount the fidge but I wanted to get it out with
Out having to remove the cabinet.
I put a row of rive nuts on the bottom of the fridge.
Now to fix these pealing ,rusty and nicotine saturated stove pieces.
A cut out for the inverter control panel.
This is some tuff stuff they used back then but it all has to go.
I love this oven.
Never smoked in.. HaHa..
It turned out good the bottom drawer does not look like one
When closed. Kinda cool.
And here's what's coming next.. Oh Boy fun fun. |
|
| Back to top |
|
|
?Waldo?
Samba Member
Joined: February 22, 2006
Posts: 9752
Location: Where?
|
| Posted: Sat Nov 07, 2015 9:24 am Post subject: |
|
|
Looking good. Nice work.
| 87vanwes wrote: |
| For the turbo ?? That's a great question. I think I have a plan using a dawse valve and possibly a solinoid. In the beginning it may be fixed until its all in and we can experiment. |
You should check out this thread. He's using a standalone electronic control for a VNT and has it dialed in really nicely. The final graphs look as good as stock eTDI turbo graphs. The components for the electronic control are not prohibitively expensive, he's willing to share the code, and you still end up with an engine that will keep on chugging (albeit a bit more slowly) even if the whole electrical system goes out on the van. |
|
| Back to top |
|
|
87vanwes
Samba Member
Joined: April 10, 2014
Posts: 204
Location: OBX NC
|
| Posted: Sat Nov 07, 2015 2:14 pm Post subject: |
|
|
[quote="Andrew A. Libby"]Looking good. Nice work.
| 87vanwes wrote: |
| For the turbo ?? That's a great question. I think I have a plan using a dawse valve and possibly a solinoid. In the beginning it may be fixed until its all in and we can experiment. |
You should check out this thread. He's using a standalone electronic control for a VNT
Thanks Andrew that was a good read. I,m a ways off from that but I still need to gather the info. Are cat dealer had volkswagen marine for a short time. The alh engine was one of them. Talk about pumping out some power, of course you have an ocean to after cool it. I will throw up some pics for you of my engine.
When I get to vnt I'm sure I will be picking your brain. |
|
| Back to top |
|
|
87vanwes
Samba Member
Joined: April 10, 2014
Posts: 204
Location: OBX NC
|
| Posted: Sat Nov 07, 2015 2:31 pm Post subject: |
|
|
A quick look at the engine. I will post more about this. I'm a bit nerdy when it comes to engine builds.
I will try to get the front chassis pics together next. |
|
| Back to top |
|
|
markz2004
Samba Member
Joined: November 13, 2007
Posts: 944
Location: Portland, OR
|
| Posted: Sat Nov 07, 2015 3:53 pm Post subject: |
|
|
Thanks for sharing  
_________________
87 Westy, 250k GW 2.4 - 2.0  , 16" wheels , 16" wheels |
|
| Back to top |
|
|
87vanwes
Samba Member
Joined: April 10, 2014
Posts: 204
Location: OBX NC
|
| Posted: Sun Nov 08, 2015 8:37 am Post subject: |
|
|
| markz2004 wrote: |
| Thanks for sharing |
Thanks for checking it out. I was hoping for some popcorn...
You made my day  |
|
| Back to top |
|
|
87vanwes
Samba Member
Joined: April 10, 2014
Posts: 204
Location: OBX NC
|
| Posted: Wed Nov 11, 2015 1:46 pm Post subject: Re: 87 Westy Syncro ALH TDI conversion ~ lots of pics |
|
|
Now for the front suspension and drive trane removal.
I'm new at this forum stuff. I guess the messages go above the pics.
I also apologize for the poor quality of the pics I need to use something
Besides my iPad. And as you can tell I am not the best key boarder either.
This thing is rusty.
I know snapon tools are expensive but well worth it on Allen and triple square sockets.
Unload the suspension about two inches with a jack.
Undo both top shock nuts both sides.
Remove the Allan bolts on upper ball joints.
Undo sway bar drop links.
Then jack it up unloading the suspension and place on jack stands.
Remove the brakes, cv joint nut, lower ball joint bolts, radius rod and off
With the front spindle assembly's.
Next the lower controll arms, cv shafts, speedo cable, diff vent and bolts
holding the carrier in.
Oh boy lots of work to do here. |
|
| Back to top |
|
|
ALIKA T3
Samba Member
Joined: July 30, 2009
Posts: 6347
Location: Honolulu,Hawaii and France
|
| Posted: Wed Nov 11, 2015 8:36 pm Post subject: Re: 87 Westy Syncro ALH TDI conversion ~ lots of pics |
|
|
Nice work!
get some pics of the viscous coupling, I saw a disc in there!! 
Also, be carefull if you drive with a rotten floor under the accelerator pedal, I almost died a few years ago when the rivets at the plastic pedal gave up as I was getting through a stop across a busy highway.Plastic pedal got unclipped from the accelerator little arm and no juice right in the intersection.
Good thing I know how vans work, right away I felt it under my foot, jump on the floor with the right hand to push on the cable lever while holding the wheel with the left hand. I cleared the intersection leaving some brown marks behind me , I tell ya!! 
_________________
Silicone Steering Boots and 930 Cv boots for sale in the classifieds.
Syncro transmission upgrade parts in the Classifieds.
Subaru EJ22+UN1 5 speed transmission
http://www.thesamba.com/vw/forum/viewtopic.php?t=416343
Syncro http://www.thesamba.com/vw/forum/viewtopic.php?t=4...num+gadget |
|
| Back to top |
|
|
87vanwes
Samba Member
Joined: April 10, 2014
Posts: 204
Location: OBX NC
|
| Posted: Thu Nov 12, 2015 10:16 am Post subject: Re: 87 Westy Syncro ALH TDI conversion ~ lots of pics |
|
|
| ALIKA T3 wrote: |
Nice work!
get some pics of the viscous coupling, I saw a disc in there!!
Also, be carefull if you drive with a rotten floor under the accelerator pedal, I almost died a few years ago when the rivets at the plastic pedal gave up as I was getting through a stop across a busy highway.Plastic pedal got unclipped from the accelerator little arm and no juice right in the intersection.
Good thing I know how vans work, right away I felt it under my foot, jump on the floor with the right hand to push on the cable lever while holding the wheel with the left hand. I cleared the intersection leaving some brown marks behind me , I tell ya!! |
Thanks Alika..
I will do some VC stuff. I am going for a very aggressive with a decoupler.
The pedal already is breaking loose so good info there. That van is getting ready to go under the knife for all its parts. I hate to do it but I will utilize as much as possible, not only for me but others as well. There will be a lot between the two vans.
I love what you did with the dash ac. I tried to comment a few times but my iPad could not take the pressure. To much data I guess. |
|
| Back to top |
|
|
|


