| Author |
Message |
Altema
Samba Member

Joined: June 20, 2010
Posts: 2904
Location: Lower Michigan

|
 Posted: Sat Oct 16, 2010 4:13 pm Post subject: Shift Rod Bushing replacement - cheater method Posted: Sat Oct 16, 2010 4:13 pm Post subject: Shift Rod Bushing replacement - cheater method |
 |
|
Note: this is an article I put together shortly after obtaining my Ghia last year, but thought it might come in handy for someone who has this task on the horizon. The actual cheat starts at step 17.
Karmann Ghia Shift Rod Bushing replacement cheater method
I got tired of the shifter feeling like it was connected to a bowl of marbles and peanut butter, so I decided to go ahead and replace the bushing. One of the difficulties with this particular job is inserting the rod though the nylon bushing while the metal bushing clip is exerting its full force to reduce the diameter of the bushing. In the process, I discovered a way to get the rod through the bushing, with the clip, that was as easy as butter. If you have never done a shift rod bushing, or you can do it blindfolded and are just curious, then read on! Any corrections or clarifications are appreciated 
Tools and items needed:
Floor or bottle jack
Two good quality jack stands.
8mm open end wrench
Small adjustable wrench (For rear linkage fastener, slip joint pliers may be used instead)
3/8 inch ratchet drive
13mm and 10mm sockets
6 inch long socket extension
Extra long needle nose pliers, 10 to 12 inch preferred
Phillips head screwdriver
Standard straight head screwdriver
Small straight head screwdriver (not stubby, just thin!)
New bushing
Bushing clip
Chassis grease
Worklight
String (optional)
Five feet of clearance in front of car to remove shaft
Paper towel or shop rags for all that OLD grease on your hands
Cold drink of choice
Lets Go!
1. Jack up front of vehicle and support with jack stands on both ends of the torsion tubes. I used a floor jack in the middle of the tube and it seemed to work well for lifting. This let me pull the jack out and have a good work space. Tires were just off the ground.
2. Time to remove the access plates and horn seal. Take out the spare tire, and remove the retaining screw and the plate.
3. While there, you will see the horn seal which is a big rubber cover. You will see why it is sometimes called a diaper 
Remove the horn seal. Mine was torn badly, so I just pulled the pieces out. Below is how it looks with the seal removed.
4. Next is the front tunnel access plate (sounds ominous, doesn't it?). Under the car is an oval plate at the front of the tunnel. Using the 10mm socket and 6 inch extension, remove the two bolts and break the plate loose. It has a rubber gasket, so you may need to pull or carefully pry the plate off. Leave the gasket there if it sticks.
5. Back inside the car, move the front floor mats enough to let you pull up the center tunnel carpet. With the e-brake up, the shift knob removed, and the shift lever in the 4th gear position, I was able to pull the tunnel carpet over the shift lever and lay it over the seat. However, the shift lever hole in my carpet is not positioned correctly, so yours may be more difficult.
6. Scratch a reference mark on the shifter mounting plate so it goes back in the same position. Remove the two 13mm bolts and lift the shifter out of the tunnel. Watch the spring, as it may fall out. There will be a second plate on the tunnel which is now loose. I just picked mine up and placed it on the front of the tunnel to keep it out of the way.
7. Lift the rear seat and put it outside the car. There will be an access plate in the middle of the center tunnel. Remove the retaining screw (IF its there), and set the plate aside. Theres your rear linkage (and part of my bushing!).
8. Remove the linkage set screw with the 8mm wrench or an adjustable wrench. Do not use vice grips or pliers like someone apparently did to mine in the past. 
9. With the 8mm wrench on your left (cars right), and an adjustable wrench or pliers to keep the other side from spinning, remove the lag bolt.
10. Rotate the linkage assembly so the hollow shaft with the ears can be pulled out with pliers. Careful that you do not drop parts like the bushings into the tunnel; it looks like they would be difficult to fish out if they bounced forward.
11. At this point, the tail end of the shift rod will be free, and you can tie a string around it if you like to help with the re-install. Ive done it twice with the string and once without. Its somewhat helpful, but not absolutely necessary once you get the hang of it.
12. Nows the time to take the dog, err, I mean rod for a walk. At the hole for the shift lever, use the long nose pliers to gently pickup the rod and slide it forward. Let it go, then pick it up and repeat. This is why extra long long-nose pliers are helpful: The longer the opening jaws, the less angle they have when gripping the rod, and the less likely they are to slip. You should use the pliers gently because any scratches or burrs will need to be sanded down so the rod surface is relatively smooth. That surface has to slide back through your new bushing, and unnecessary roughness will take material off the inside your bushing, and it might not make it the next 20 years
13. Keep sliding the rod forward until it stops and you hear a solid clunk in the front of the car. That usually means the rod is at the end of the tunnel and ready to be pulled out from underneath. If you feel inside the tunnel access opening and dont find it, it may be hitting on some of the other hardware in the tunnel. If that is the case, go back inside the car with the pliers, lift the rod, pull it back an inch, then try to move it further forward. Only happened to me once, and it was easy to get it out the rest of the way.
14. At the front access opening for the tunnel, reach in and grab the end of the rod and pull it out. I used two fingers, those of you with less clumsy hands might get your whole hand in there. A hooked piece of coat hangar might work as well. Just dont get your hand stuck
you would look funny showing up for work dragging a Volkswagen on your arm, and it may make using the elevator or stairs difficult.
15. From under the car, slide the rod towards the front, guiding it though the openings to the bumper. When you get to the bumper, rotate the shaft so the fitting is facing downward, then you may need to put a little downward pressure on the fitting to get past the bumper. If your bumper alignment is lower than usual and you cant get the rod out, you may need to loosen the bumper bracket bolts and lift the bumper a bit.
16. Remove the old bushing remains if anything survived, then unpack the new bushing and clip. I have no idea why they sell them separately.
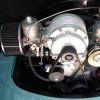
17. Time for the trick: Place the clip on your long nose pliers or other suitable tool, then gently spread it so the ends are barely apart, then line up the ends and release the pressure so the clip is holding itself open. Most clips have relatively square ends and do this easily. If your ends are angled and cannot stay open, then you can file or Dremel them flat. A test fitting pic is below showing how it will sit on the shaft. Notice that the clip is in place, but is NOT closing the bushing.
18. Install the bushing and clip in the support bracket, clean and lightly grease the rod, and insert the rod through the front openings. When you get to the position shown in the photo below, the rear of the rod will be near the support bracket inside the car, so you will need to get the long nose pliers and guide it into the bushing. Ignore the bushing on the rod in the photo, it was left there from the test fit by accident.
19. Once the rod is in the bushing, you will need to go back under the car and push the head end though the tunnel access opening. With no pressure from the clip, the rod should slide smoothly through the bushing using the pliers to walk the rod back into position. Remember to use the lift and slide approach, as there are cable housings inside the tunnel that can catch the rod end.The photo below shows the rod, bushing, and clip in position, but the clip is still holding itself open.
20. With the rod in position, you are ready to pop the clip. Take a regular screwdriver to push back on one half of the clip, and a small screwdriver through the bolt hole to put forward pressure on the other half of the clip (2nd pic below). The clip will pop closed and clamp down on the bushing. Rotate the bushing so the opening is to the left side of the tunnel, and your job with it is done.
21. In the back of the car, reinstall the rear bushings (or new bushings if needed), and reinstall the tube with ears and the lag bolt. Then, align the linkage with the set screw hole in the transmission shaft. My set screw shows the abuse incurred by using the wrong tool. Also, the screw has a hole in it, so it probably was designed for a safety wire.
22. Are we there yet?!? Almost. Replace the lower plate for the shift lever, then install the spring and shift lever using the reference marks you made earlier. Take turns with the wrench so the plate goes down evenly
dont just crank down one bolt then other.
23. Test the shifter. You should have a recognizable H shift pattern now. Hey Ma, I can tell what gear its goin into!
24. If all is well, wash all the grease and gunk off your hands and replace the carpet...
Yes, my carpet is wrong, came to me that way. PO installed bug carpets?
25. Smile at your significant other and say you saved hundred of dollars and deserve __________ (you fill in the blank!)
Thats all for now, let me know if you have any comments or corrections.
Paul
Last edited by Altema on Sat Oct 16, 2010 4:42 pm; edited 2 times in total |
|
| Back to top |
|
 |
ernstben
Samba Member

Joined: April 30, 2005
Posts: 621
Location: Manchester, Mi
|
| Posted: Sat Oct 16, 2010 7:51 pm Post subject: |
|
|
Well Altema, I appreciated your efforts here. This is a job that I'm going to be tackling in the near future, and this is the first time I've read a walk-through.
Thanks! |
|
| Back to top |
|
|
sputnick60
Samba Moderator

Joined: July 22, 2007
Posts: 3916
Location: In Molinya Orbit
|
| Posted: Sat Oct 16, 2010 10:08 pm Post subject: Re: Shift Rod Bushing replacement - cheater method |
|
|
| Altema wrote: |
Karmann Ghia Shift Rod Bushing replacement cheater method
Paul |
Paul,
I reckon you've done a great job of documenting the task. My suggestion is you cut and paste all of what you've posted onto the tail end of the thread Garry rightly linked. Then ask (via a PM) John (or Glen) to delete this thread so in a few days we'd have forgotten any error was made and all the good stuff would be in the right bucket.
The main thing is that you've made good use of the maco focus in your digital camera and the pictures are well lit and nicely clear.
Also a big thumbs up for making a contribution.
Nicholas
_________________
'66 Karmann Ghia Cabriolet...
'65 Porsche 356C Coupe...
2005 Mecedes Benz C180 Kompressor Estate
Stop dead photo links! Post your photos to The Samba Gallery! |
|
| Back to top |
|
|
TailTip
Samba Member
Joined: July 08, 2006
Posts: 644
Location: Western Washington
|
| Posted: Sat Oct 16, 2010 10:19 pm Post subject: |
|
|
| Paul, Thanks for sharing! |
|
| Back to top |
|
|
Shorrock
Samba Member
Joined: January 02, 2005
Posts: 433
|
| Posted: Sat Oct 16, 2010 10:19 pm Post subject: |
|
|
Very nice job with the write up and pictures! I have never put the busing on the shaft and tried to install in that manner. I am surprised you can do it that way unless your bushing hanger ID is much bigger than it should be. I always just grease mine put it on the end of my finger and pop in. Then I grease the rod and slide it in. Having done it several times the way you describe I did mine a bit different last week and it went much easier and quicker. Just wish I had done such a nice write up.
http://www.thesamba.com/vw/forum/viewtopic.php?t=431799&highlight=
Put in my new Berg 12" extra curve shifter and noise, noise, noise! I did not hear it with the Hurst shifter but then it is spring loaded. Bushing again?! this is the second time I have replaced it. The last time I thought I would kill myself and said never again. Well this time I gave it some thought and in less than an hour from start to finish, including waxing the nose since the bumper was off, did it by myself without any of the frustration of last time or asking for help from my wife (who also said she would not help again the last time). I took some 3/4 inch white PVC pipe cut it 6 feet and cut an angled slot 1/2 through 1/2 inch from the end and drilled a hole at the bottom of the slot. Slid the pipe in till I was butting up against the shifter rod and slip a piece of wire into the slot and tied it around the shifter rod head. Turned it 90 degrees and easily pulled it all the way out of the bushing. The old bushing was still installed but the front flange that holds the spring had cut through. Using my pipe I slid it right back in without a hang up. Installed the new coupling and done. The spring apparently helps reduce noise at least in my case because it is now gone even though the bushing itself was still supporting the shaft.
|
|
| Back to top |
|
|
Altema
Samba Member
Joined: June 20, 2010
Posts: 2904
Location: Lower Michigan
|
| Posted: Sun Oct 17, 2010 7:19 am Post subject: |
|
|
| Shorrock wrote: |
| I have never put the busing on the shaft and tried to install in that manner. I am surprised you can do it that way unless your bushing hanger ID is much bigger than it should be. |
It won't fit that way, the bushing was on the shaft because I forgot to remove it before snapping the picture. After that photo, I pulled it off and inserted the bushing in the hanger with the metal clip still proped open.
I really like the PVC pipe method you used and will use it if this job comes up again. The pipe, along with zero resistance from the bushing, should make for a really quick job!
Paul |
|
| Back to top |
|
|
topghia
Samba Member

Joined: March 12, 2010
Posts: 35
|
| Posted: Thu Oct 21, 2010 8:36 am Post subject: |
|
|
I must say for a job I'm soon to be undertaking I've found this thread very enlightening.
thanks |
|
| Back to top |
|
|
jwold
Samba Member
Joined: September 30, 2008
Posts: 2088
Location: Portland, OR
|
| Posted: Thu Oct 21, 2010 10:03 am Post subject: |
|
|
| I just did this on a 70 bug last night...am almost finished. Proved to be a fairly easy job...I dind't need to spring the clip open as you suggest as a good push and plenty of grease and it went through the bushing easily. I pulled the rod all the way out, cleaned, sanded and lubed it before I put it back in. |
|
| Back to top |
|
|
MK1971
Samba Member
Joined: September 07, 2010
Posts: 83
Location: Upper Marlboro, Maryland
|
| Posted: Sat Oct 30, 2010 2:18 pm Post subject: |
|
|
| Im going to give this method a try. I couldnt get my rod to go into the bushing without pushing the bushing through the hanger. I checked my hanger and it looks good chamfered the end of the rod lubed the rod spread the clip a little still no luck. Will try this soon Thanks! |
|
| Back to top |
|
|
69Ghia303
Samba Member
Joined: June 02, 2011
Posts: 1
|
| Posted: Thu Jun 02, 2011 9:32 pm Post subject: Still having a clutch problem |
|
|
I just used your instruction (thanks by the way excellent) Installed new bushing in about an hour.
However I cannot go into second gear or reverse? All the other gears work fine and the shifting is nice in firm. I adjusted the clutch cable and still no second? any suggestions? |
|
| Back to top |
|
|
Altema
Samba Member
Joined: June 20, 2010
Posts: 2904
Location: Lower Michigan
|
| Posted: Thu Jun 02, 2011 9:52 pm Post subject: Re: Still having a clutch problem |
|
|
| 69Ghia303 wrote: |
| However I cannot go into second gear or reverse? All the other gears work fine and the shifting is nice in firm. I adjusted the clutch cable and still no second? any suggestions? |
Sounds like you need to loosen your shifter mounting plate and nudge it to the right some.
Paul |
|
| Back to top |
|
|
doublecanister
Samba Member

Joined: September 23, 2008
Posts: 1184
Location: Richmond, Va
|
| Posted: Fri Jul 27, 2012 10:25 am Post subject: Thanks in advance |
|
|
Thank you Altema!
I've long put off this job cause I wasn't sure what's involved, now
I understand!
My 73 Thing has needed this for a while, seems on hot days 4th starts rattling and is rather annoying, hold the shifter a bit to 1 side, and it goes away, spray lithum grease helps but dont last. I think I can do this now.
Thanks again!
T
_________________
****************************************
2020 - Mustang Eco Boost [High Performance]
1973 - Thing
1966 - Mustang GT- Fastback
1951 - Ford F1 pickup Flathead V8 |
|
| Back to top |
|
|
Volfandt
Samba Member

Joined: March 15, 2012
Posts: 500
Location: Knox County, East TN
|
| Posted: Tue Jul 31, 2012 4:02 pm Post subject: Shifter |
|
|
This is a very timely topic. Granted it's a couple yrs old but non the less, it's very timely AND good for me 
I'm tired of my vibrating shifter when i cruise over 50 mph and having to hunt to find 1st. Purchased a new bushing and rear coupler and will be using this thread to take care of the business soon
Dave
_________________
1972 Karmann Ghia, the Dragon slayer.... |
|
| Back to top |
|
|
Andre@KGPR/Airhead
Samba Member
Joined: June 15, 2011
Posts: 228
Location: Ventura CA
|
| Posted: Tue Jul 31, 2012 10:48 pm Post subject: |
|
|
| Great thread-- I've been meaning to post a video on this forever... |
|
| Back to top |
|
|
Altema
Samba Member
Joined: June 20, 2010
Posts: 2904
Location: Lower Michigan
|
| Posted: Wed Aug 01, 2012 7:09 pm Post subject: Re: Thanks in advance |
|
|
| doublecanister wrote: |
| lithum grease helps but dont last. I think I can do this now. |
I don't think grease would have helped mine at the time; the rod was rattling around on the bare metal support and the bushing was under the rear seat! You also may want to check the condition of the coupling bushings. The red urethane replacements will give you better feel and more precise shifting. However, the replacement metal "cage" that came with my new bushings was only fair quality, so I kept the original German coupling and just swapped in the urathane coupling bushings.
Paul |
|
| Back to top |
|
|
Altema
Samba Member
Joined: June 20, 2010
Posts: 2904
Location: Lower Michigan
|
| Posted: Wed Aug 01, 2012 7:17 pm Post subject: |
|
|
| Andre@KGPR/Airhead wrote: |
| Great thread-- I've been meaning to post a video on this forever... |
A video would be great! I think I'd need a second pair of hands or a tripod for that. I usually get partway through a job and think "Oh snap, I should have gotten photos!" For this job, I think someone had asked about instructions so I was planning on taking some photos. I do regret the one pic where I forgot to take the bushing off the rod after a test fit. It's impossible to install the bushing on the rod that way, so it's misleading. Maybe I'll photoshop that image and reload it, lol.
Paul |
|
| Back to top |
|
|
Zack1978
Samba Member
Joined: June 07, 2006
Posts: 544
Location: NJ
|
| Posted: Wed Sep 26, 2012 6:01 pm Post subject: |
|
|
What are all the parts needed to do the total job? What is the coupling bushing? I know I will need the shifter bushing, but what else to make the job complete? What are the best parts to buy? Who is the best supplier?
Thanks,
Zack
_________________
1972 Coupe |
|
| Back to top |
|
|
Altema
Samba Member
Joined: June 20, 2010
Posts: 2904
Location: Lower Michigan
|
| Posted: Thu Sep 27, 2012 9:17 am Post subject: |
|
|
| Zack1978 wrote: |
What are all the parts needed to do the total job? What is the coupling bushing? I know I will need the shifter bushing, but what else to make the job complete? What are the best parts to buy? Who is the best supplier?
Thanks,
Zack |
Hi Zack, I bought my parts off the shelf at a local VW store, but there are better parts available from other companies.
Parts wise, you only need the shift rod bushing which will be the nylon bushing itself, and the metal ring which usually comes with it, but sometimes is sold separately.
The rear coupler you can order that from Jbugs at the link below. This one is much higher quality than my replacement was, so you should be fine using it as-is.
http://www.jbugs.com/product/16-5105.html
The same site has the front bushing (part code 98-2038)
and the shift rob bushing clip (part code 111701263)
Paul |
|
| Back to top |
|
|
Benfish
Samba Member

Joined: July 27, 2012
Posts: 113
Location: NPR Florida
|
| Posted: Fri Nov 16, 2012 5:56 pm Post subject: |
|
|
Paul, thanks for the info on changing the shift rod bushing. I have a 66 type 1 bug and performed this procedure today and it was a smashing success. It shifts like a new car now. I also used the other tricks mentioned in that other post that was very helpful, especially about setting that ring and then 'popping' the ring once the shaft was installed. The whole job took me about three hours but that included painting the shifter and the hatch plate and going to get the kids from school. I had my computer out in the garage for quick reference to this thread but felt like I could have done it with my eyes closed because I had been looking at those pictures for weeks. Thanks again.
Ben |
|
| Back to top |
|
|
Brassneck
Samba Member

Joined: November 17, 2012
Posts: 420
Location: Seattle
|
| Posted: Thu Mar 28, 2013 10:02 am Post subject: |
|
|
Hi Everyone,
I'm about to tackle this project (parts on the way) and when checking the access plates, it looks like my bumper is lower than will allow the rod to clear the access holes...I'd rather not loosen the bumper brackets, so...
My question is, do you truly need to remove the shift rod completely out or can the new bushing be put on just as it exits the front access tunnel? Also, without having done this yet, I'm guessing you have to pull the bushing clip apart somewhat to get it on the rod and around the new bushing, correct? Is there an issue with over stretching it? Or is it pretty straight forward. I'm thinking it will just stretch enough to go on the rod, but perhaps this is why the rod must be removed?
Thanks in advance for the help! |
|
| Back to top |
|
|
|


